How to build a game with Unity - Part 3

Welcome to this series of blog posts about building a game with Unity. In this series we’re going to explore a fun vacation project that my son and I worked on in summer 2022.
In this blogpost we’ll discuss how to add an animated player character to the game. We’ll cover the following topics:
- Importing sprites for animated characters
- Adding an animated sprite to the game
- Controlling the animated sprite using a keyboard
- Using animators to control the animation
Let’s get started by importing sprites for the player character.
Importing sprites for animated characters
In the previous blogpost we discussed how to set up sprites in Unity to design a level. This is not the only usage for sprites. You can use them for other things too. For example, you can turn a set of sprites into a player character.
Let’s import the image that will contain the sprites for our game character. If you haven’t done so, you can download the asset pack to get the images we’re using on your own machine.
From the asset pack, we’re going to be importing Characters/Basic Charakter Spritesheet.png into the project. Follow these steps to import the asset:
- Navigate to the Resources folder in the Project window
- Right click inside the new directory and choose Import New Asset
- Navigate to the image and load it in the project.
After importing the new sprite, we need to modify the sprite so we can use it in our character. Select sprite and set the properties like so:
- Sprite Mode: Multiple
- Pixels per unit: 16
- Extrude edges: 0
- Filter Mode: Point
Click apply to save the settings for the sprite.
Next, you need to slice the sprite to get the individual poses of the player character. In the Inspector window, click on the Sprite editor button to open the sprite editor.
In the Sprite editor click the Slice button and use the following settings to slice the sprite.
- X: 48
- Y: 48
Click the Slice button to slice the sprite. Then, click the Apply button inside the Sprite editor to save the changes.
Now that we’ve imported and sliced the sprite, we can animate the sprite in the game.
Adding the player to the scene
Before we can animate a sprite, we need an object that will represent the player. There are various ways to create a new object. Instead of dragging an asset from the Project window, we’re going to create an empty object.
Right click on the Scene window and choose Create empty to create a new object. Name it Player. This new empty object we’ll expand with various components to turn it into a player controlled character.
Let’s start by adding a basic animated character.
Adding an animated sprite to the game
Creating an animated sprite in the game is done by dragging two or more cells from a sprite onto the scene.
In the Project window, expand the character sprite. You should now see the individual poses of the character.
![]()
Select the first 4 poses in the sprite we just expaned and drag them onto the scene. This will open a file dialog to save the animation we’ve just created. Create a new folder Animations in the project and save the animation in the folder. Give the animation the name Player_Idle.
By dragging the sprites, we created two things:
- An animation with the name Player_Idle
- An animator that controls which animation is currently playing.
To make it easier to see the character in the editor, we need to take one more step. We need to configure a sprite for the sprite renderer.
First, select the Player object in the Hierarchy window. Then, drag the first image from the character sprite in the Project window onto the Sprite field of the sprite renderer component in the Inspector window.
You can now see the player character in the scene.
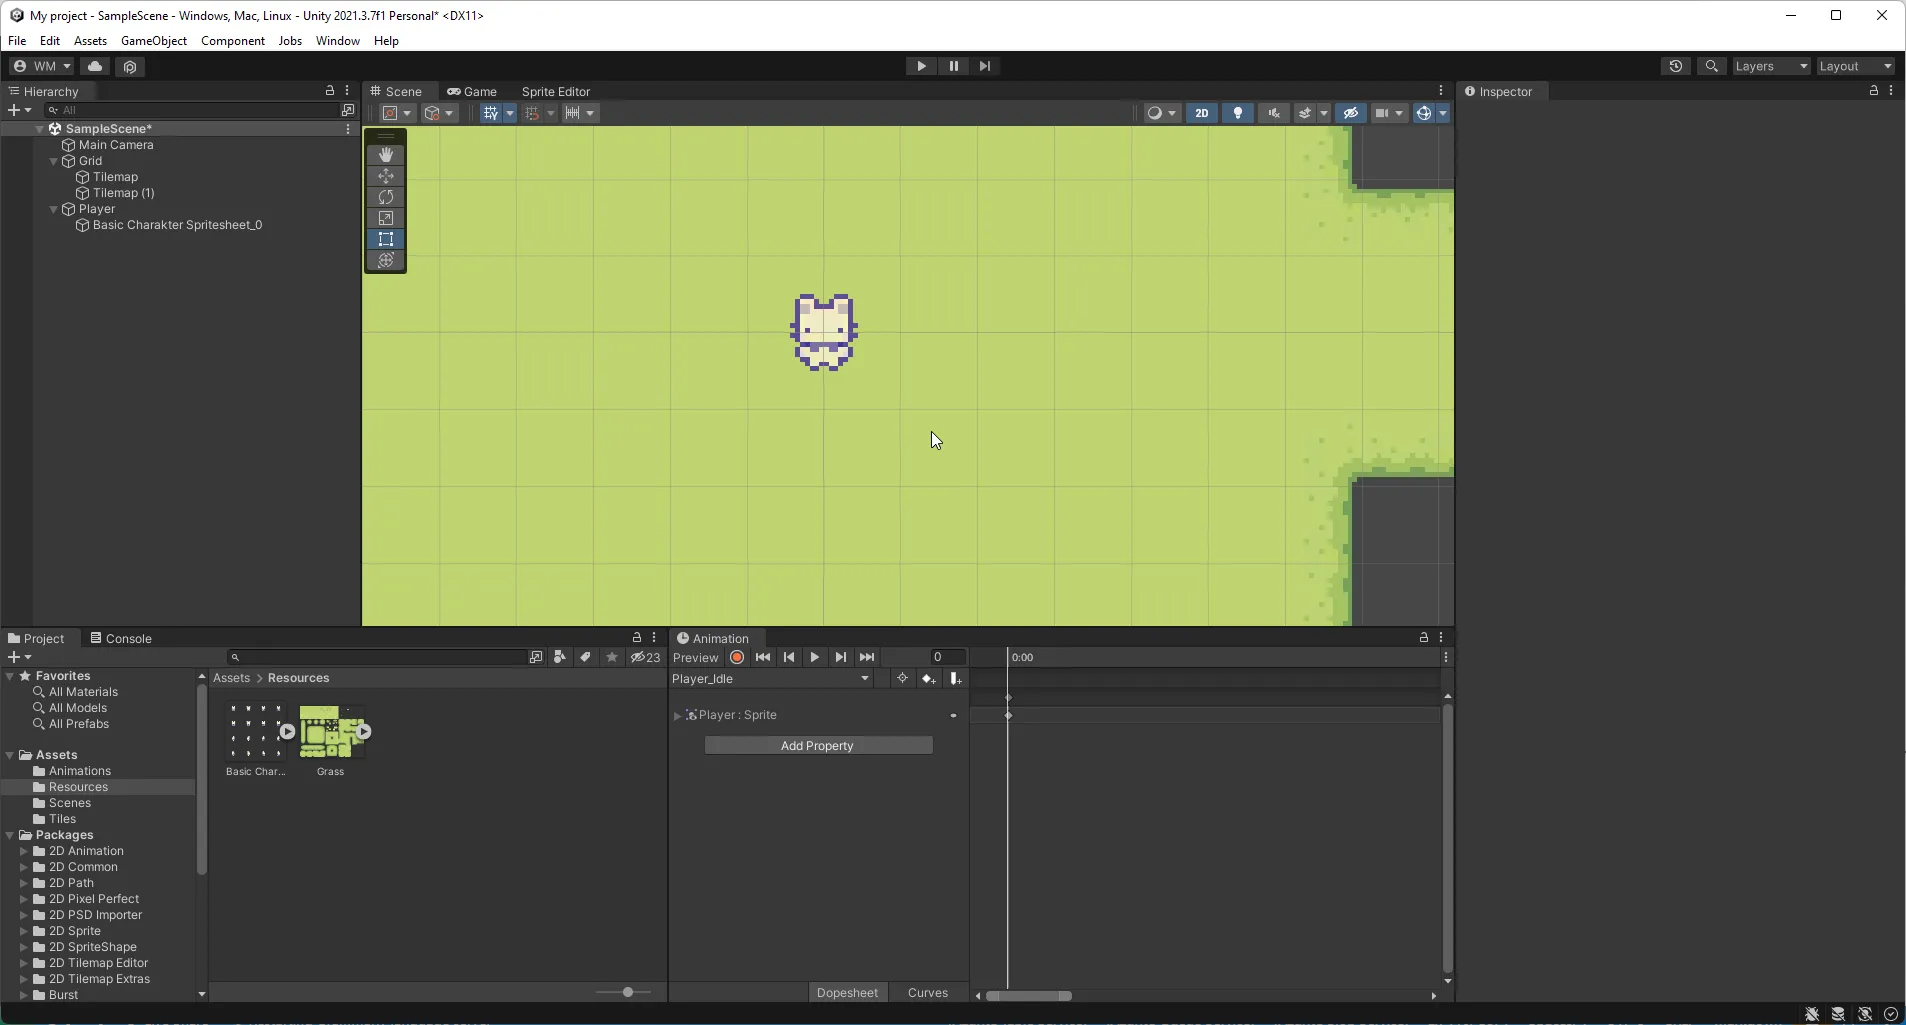
When you start the game with the Play button at the top of the screen, you’ll see the bunny animating in the middle of the level.
The animation is a bit fast, but we’ll fix that by editing the animation. Click the Play button again to stop the game, so we can edit the animation.
To edit the animation, we’ll need to open the animation window. You can do this by going to the menu Window -> Animation -> Animation. You can drag the window to the right of the Project window.
In the Animation window, enable the sample rate editor so we can change the speed at which the animation plays.
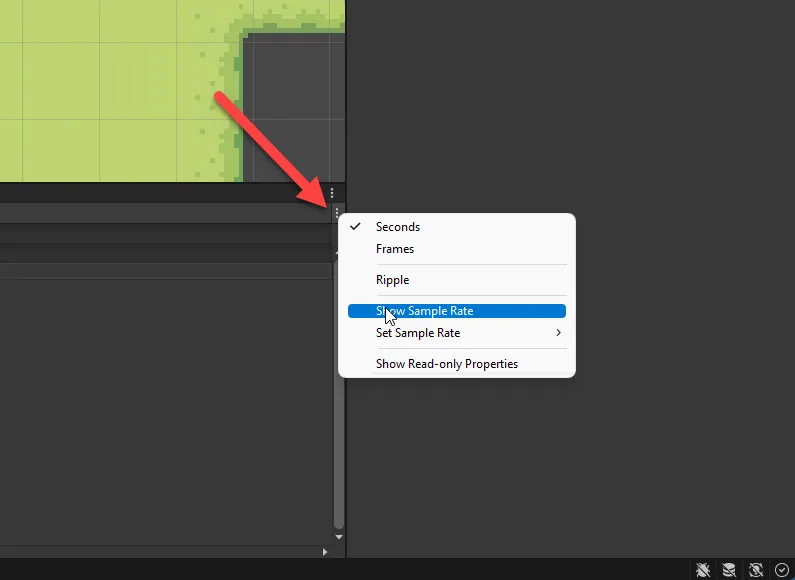
You can set this value to anything you like. Higher numbers indicate the animation will play faster. Lower numbers indicate the animation will play slower.
For the bunny animation, we’re going to slow the animation to a sample rate of 6.
After setting up the first animation, we can start to work on the script that’s going to control the character.
Controlling the animated sprite using a keyboard
So far, our player has been just an animated picture. Now it’s time to turn it into an interactive character.
We need to perform two tasks for this:
- We need to set up a rigid body, so we can control the speed of the character.
- We need to set up a script to convert user input into a velocity for the rigid body.
Let’s start by setting up a rigid body.
Setting up the rigid body for the character
Unity has a pretty nice physics system in the game engine that we can use to implement various game interactions. The physics system can handle rigid bodies like objects and sprites. It can also handle ragdoll physics which is used to control 3D characters.
We’re going to be using rigid body physics for our game since we don’t have anything 3D in the game.
Select the Player object in the Hierarchy window, and follow these steps to set up a rigid body:
- In the Inspector window, add a new component and search for Rigid Body 2D
- Set the Gravity scale property to 0. Otherwise, the character will float off screen.
Next, we’re going to work on the script that will control the player.
Controlling the player character with code
So far, we’ve been dragging and dropping assets and editing properties. That’s about to change. We’re going to write a bit of C#.
I think this is one of the most powerful things of Unity. You don’t need to write a ton of code to write a game. And what you write is very sensible.
We’re going to write a small script that takes user input and translates it into movement of the player game object.
There are two options to control object movement. You can set it’s position or you can set the velocity and let the game handle the positioning.
We’re going to use velocity to control the player movement. Using velocity works better because we can let the game control how to handle things like the player hitting a wall.
We don’t have a wall yet, but we will in the next blogpost. So this is a bit of a preparation step for that.
Follow these steps to create the script behavior:
- Right click the Project window and create a new folder called Scripts.
- Right click in the Scripts folder and choose Create -> C# Script.
- Give the script the name PlayerController
Double-click on the script to open it in your configured code editor. Add the following content to the script:
public class PlayerController : MonoBehaviour
{
    public float speed;
    public Rigidbody2D rigidBody;

    void Update()
    {
        var horizontal = Input.GetAxisRaw("Horizontal");
        var vertical = Input.GetAxisRaw("Vertical");

        var movement = new Vector2(horizontal, vertical);

        rigidBody.velocity = movement * speed;
    }
}
Let’s go over what the script does. The script accepts two variables:
- speed: This controls how fast the character can walk in the game.
- rigidBody: The rigid body that we’re controlling.
We’ve added one method called Update to the script. The Update method is
called each frame. In this method, we need to write code that we want to run
whenever a frame is rendered.
In the Update method, we first retrieve the horizontal and vertical axis
value. This axis is controlled by your keyboard, XBox controller, Playstation
controller, or joystick. The value for the horizontal and vertical axes can be
between -1 and +1 depending on the direction. Down and left are the positive
sides of the axes.
After getting the direction of the force we want to apply we construct a new 2D-vector based on the axis values.
Finally, we multiply the new movement vector with the speed and apply it as the velocity vector for the rigid body.
Now that we have the script, let’s attach it to the player.
In the unity editor, select the player object in the Hierarchy window, and follow these steps to assign the behavior to the player:
- Add a new component in the Inspector window. Search for PlayerController.
- Next, drag the Rigid Body 2D component from the inspector on top of the rigidBody field of the component we just added.
- Finally, set a value for the speed field in the PlayerController component.
Start the game, and try to move around. The player object will move around the level. It will only play the idle animation at this point, so we need to wire up a few more things.
Using animators to control the animation
In the fhe final part of this post, we’re going to expand the player object with a few more animations.
Adding more animations to the player
First things first, we need animations for the following movements:
- Walking left
- Walking right
- Walking up
- Walking down
We can create these by following these steps:
- In the Hierarchy window, select the player object.
- In the animation window, click on the dropdown where it says Player_Idle and choose Create new clip.
- Give the new animation a good name, for example: Player_Walk_Left.
- In the Project window, expand the Resources folder and the Basic Charakter Spritesheet
- Drag the 4 images where the character is facing to the left onto the animation window.
- Set the sample rate to 6 so the animation matches the first animation we created.
Repeat the 6 steps for each of the directions.
We’ve now expanded the player object with more animations. The game won’t use them yet as we have to modify the animator. Let’s do that next.
Prepare the animator for more complex animations
Animations are controlled by an animator in Unity. The animator is a state machine that accepts inputs and maps those inputs to various animation states.
You can do some pretty complex things, like layering and blending animations.
We’re going to build a basic movement animator by blending animations. Before we can do that, we need to prepare the animator.
Open up the animator window. Go to the menu Window -> Animation -> Animator. You can dock this window in the middle of the screen.
Initially, the window will display all of the animations in the animator window. You can remove all animations except the Player_Idle animation from the window. We’re left with an animator that will immediately start playing the idle animation.
Let’s add a few inputs for the animator to respond to. We need two things:
- A parameter that controls whether the player is moving.
- Next, a paramater that determines the horizontal direction.
- Finally, a parameter that determines the vertical direction.
The first parameter is used to switch between idle and moving. The second, and third parameter are used to determine which animation to play while moving.
To add the parameters, switch to the Parameters tab inside the Animator window. Next, click the + sign and choose Float. Name the parameter Speed.
Repeat the process to add a parameter two more times for HorizontalMovement and VerticalMovement.
Now that we have the parameters, we can start working on expanding the animator.
Adding a blend tree to the animator
We’re going to use a tool in the animator that allows you to blend animations. The way unity does this is by using a blend tree. Blend trees can be used to blend two or more animations in 2D or 3D. We’re going to use the 2D blend tree for now.
Right click the animator window, and choose Create state -> From New Blend Tree. Next, double click the Blend Tree to open up the details for it.
Follow these steps to set up the blend tree for the walking animation:
- In the Inspector window, set the Blend type to 2D simple directional.
- Click the + button in the Motion section and add a Motion field until you have 4 entries.
- Then, from the Project window, drag the animations from the Animations folder in the following order: Up, Down, Left, Right onto the motion fields.
Now we need to configure the position of each of the animations.
- For the up animation, set the Pos Y field to 1 and the Pos X field to 0.
- For the down animation, set the Pos Y field to -1 and the Pos X field to 0..
- For the left animation, set the Pos X field to -1 and the Pos Y field to 0.
- For the right animatino, set the Pos X field to 1 and the Pos Y field to 0.
To complete the blend tree, we need to configure the X and Y input. We can set the Parameters field at the top of the inspector to HorizontalMovement, and VerticalMovement respectively.
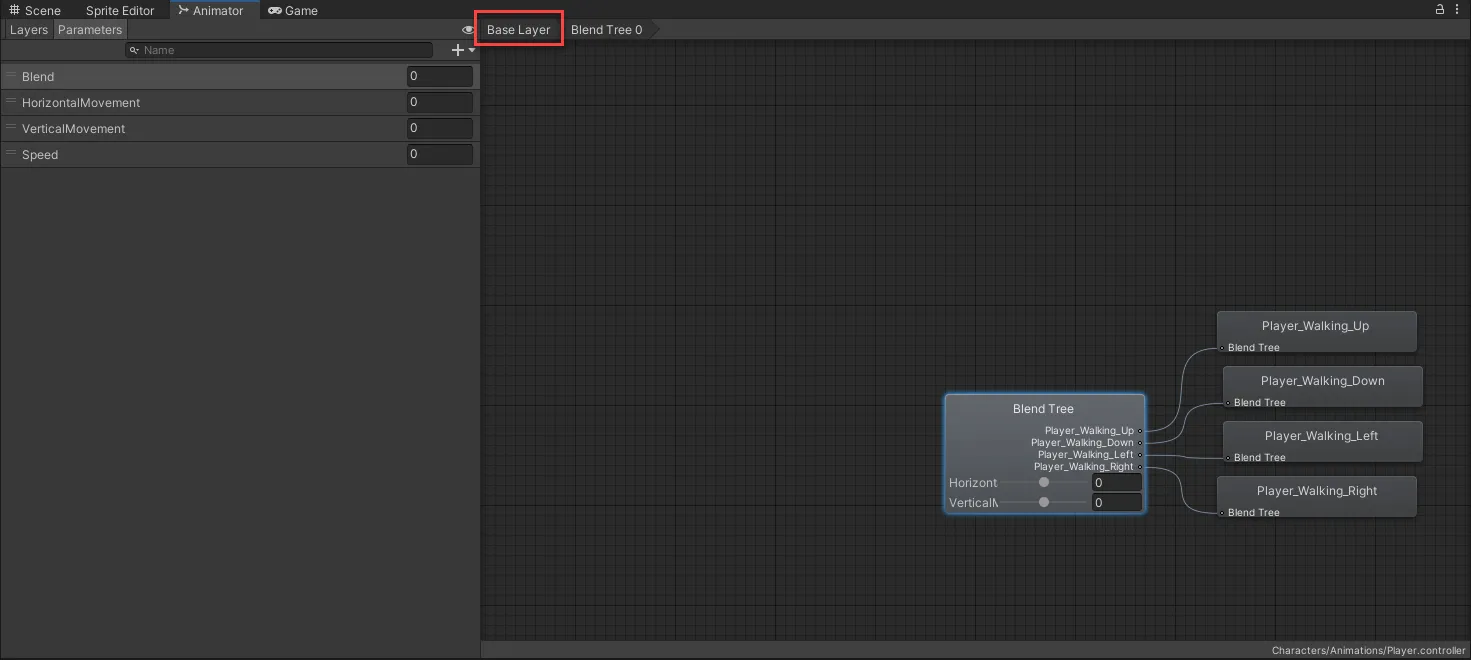
After completing the blend tree, you should have a blend tree that looks like this in the inspector window.

You can test the blend tree by dragging the red dot in the middle of the blend tree view inside the Inspector window. Make sure you click Play at the bottom of the inspector to see the animation in action.
Let’s get back to the main animator window to complete the animator configuration. You can do this by clicking on the Base layer in the animator window.
We need to configure the animator to transition into the blend tree when we’re moving, and into idle when we’re not.
Configuring transitions
To configure the transition between idle, and moving, we need to first add a transition from idle to the blend tree.
Right click the Player_Idle state, and choose Make transition. Now click on the blend tree component that we created earlier.
Select the transition. With the transition selected, change the following settings in the Inspector window.
- Disable Has exit time setting.
- Expand the Settings underneath the Has exit time setting and set the transition duration to 0.
- Add a new condition to the list of conditions by clicking the + button.
- Choose Speed from the first dropdown, and Greater from the second dropdown.
- Set the value for the condition to 0.01.
Add another transition from the Blend tree to the Player_Idle state. Configure the same settings as before for the second transition.
For the condition of the second transition choose the following:
- Parameter: Speed
- Condition: Less
- Value: 0.01
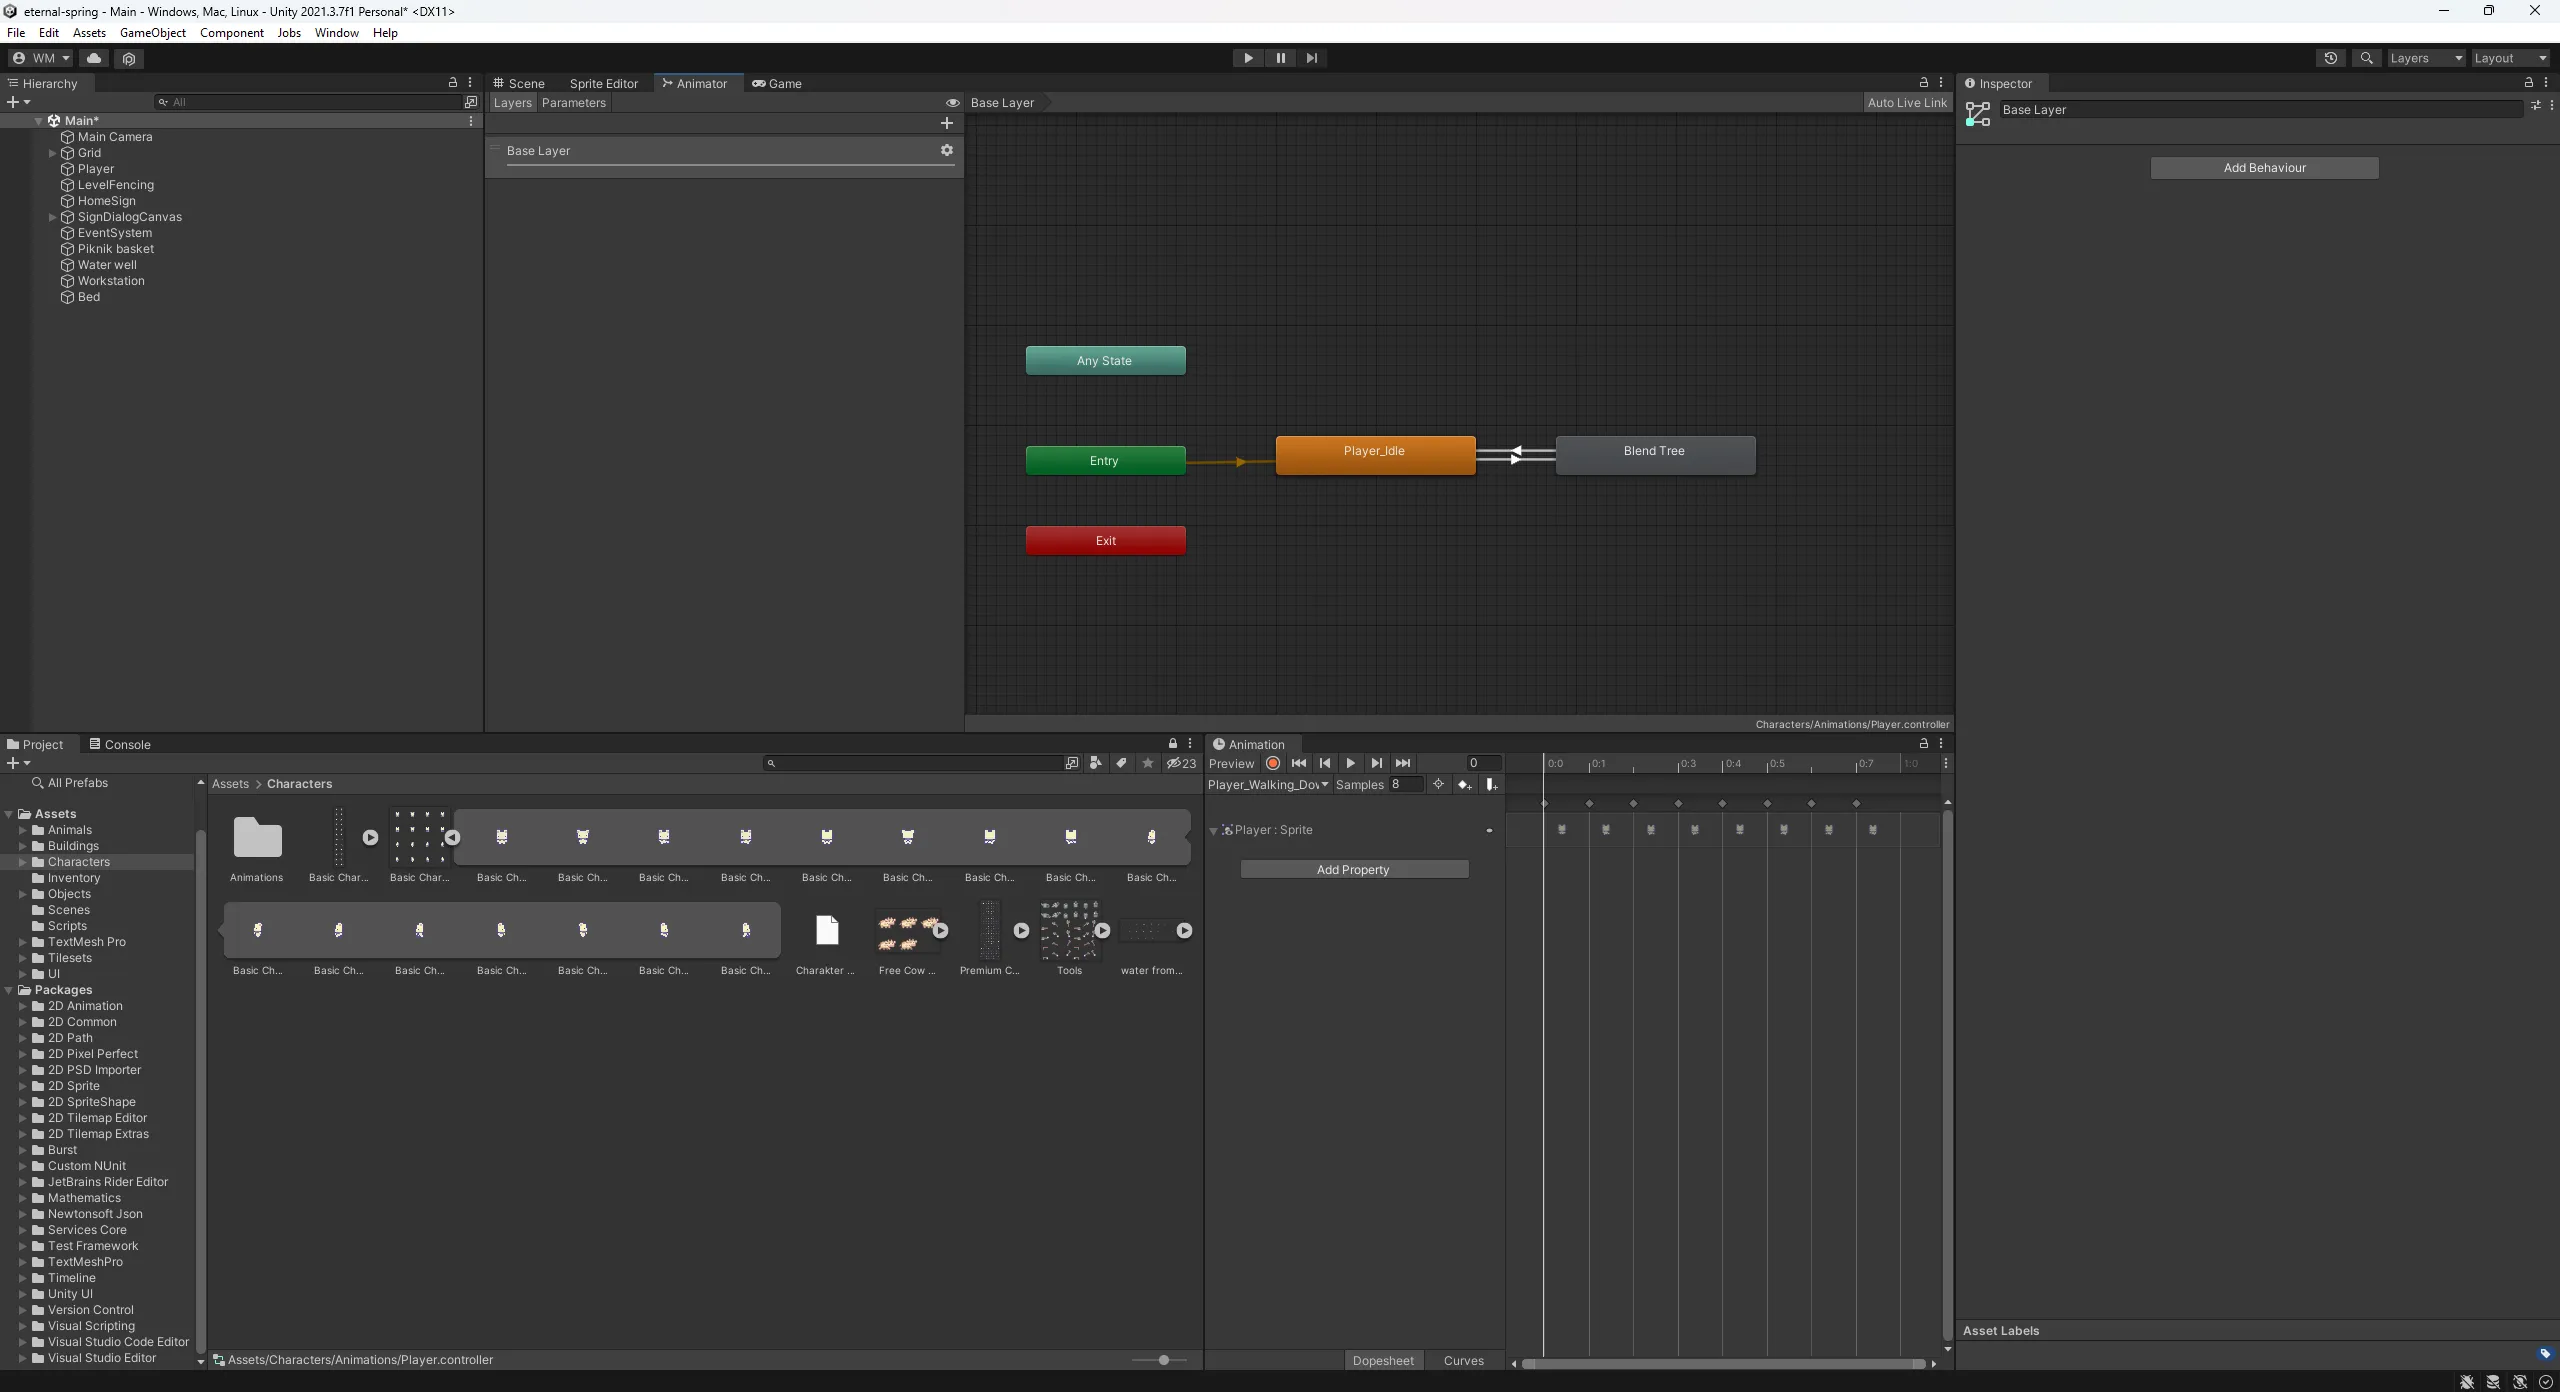
You should end up with the animator looking like the image below.
Now that we have the animator set up, let’s wire it up to the PlayerController behavior that we created earlier.
Wiring the player controller to the animator
To connect the animator to the PlayerController, we need to edit the C# script we created earlier. You can open it again by double clicking on the script in the Project window.
Update the script so it has the following content:
public class PlayerController : MonoBehaviour
{
    public float speed;
    public Rigidbody2D rigidBody;
    public Animator animator;

    void Update()
    {
        var horizontal = Input.GetAxisRaw("Horizontal");
        var vertical = Input.GetAxisRaw("Vertical");

        var movement = new Vector2(horizontal, vertical);

        rigidBody.velocity = movement * speed;

        // Added to update the animator.
        animator.SetFloat("HorizontalMovement", horizontal);
        animator.SetFloat("VerticalMovement", vertical);
        animator.SetFloat("Speed", movement.sqrMagnitude);
    }
}
First, we’ve added a new public field for the animator. Then, we’ve added code to update the parameters of the animator with the horizontal, and vertical movement speed, and the magnitude of the movement vector.
We’re using the square magnitude as a performance optimization. You won’t notice this as much in a small game. But the performance difference between magnitude and square magnitude can be quite large in bigger games.
After updating the script, go back to the Unity editor and follow these steps to connect the animator to the player controller:
- Select the Player object in the Hierarchy window.
- Drag the animator component in the Inspector window to the animator field of the PlayerController inside the Inspector window.
Now you can start the game and it will allow you to move around with the right animations.
Summary
In this post we’ve covered how to set up a player character for the game. We’ve also spend quite a bit of time on animations and controlling the animations based on the actions taken by the player.
As you may have noticed during testing, the game doesn’t stop you from going off the tilemap and you can walk through walls. We’re going to fix that in the next blogpost where we’ll talk about collisions.