Quarkus: Java revisited!

Okay, I’m going to be honest here. I’m not a huge fan of Java. The language feels a bit behind what Kotlin and C# are offering these days. Although I have to admit that it has gotten some pretty nice improvements. I’m also a bit tired of Java because most frameworks are bloated and slow.
After years of trying to get away from Java I figured I should give it another try. After reading what Quarkus has to offer I was happy to give Java another try. It turns out, Java is still pretty cool despite what I just wrote.
In this quickstart guide to Quarkus, I’ll take you through the steps of creating a new Quarkus project, exploring its extensions and building business logic with Domain Driven Design (DDD) principles. I’ll show you how to build a basic aggregate, add command handlers and integrate various components to create a DDD-oriented microservice in Quarkus.
Whether you’re a seasoned Java developer or just getting started, this guide will provide a straightforward introduction to Quarkus and its capabilities. So why wait? Let’s dive in and see what Quarkus can do for you!
What is Quarkus?
When it comes to building microservices, Java isn’t exactly my favorite. Many frameworks out there have a long startup time and are huge in terms of memory consumption. It’s a pity really, because Java can be quite productive with the right tools.
Quarkus is a framework that’s different from your typical Java framework:
- First, It allows you to compile your microservice as a native executable so your service is lightning fast.
- Next, it has a compile-time dependency injection mechanism that’s fast and consumes less memory.
- Finally, it features a very large collection of extensions for all the typical things you expect a microservice framework to provide.
The framework is based on popular Jakarta EE standards. Jakarta is a combination of standards for various things like RESTful services, persistence, monitoring, reactive messaging, and more. It’s a solid standard which means that you can expect a solid performance from Quarkus.
As with all things though, the proof of the pudding is in eating it. So let’s build a microservice with Quarkus and explore what it has to offer.
Creating a new Quarkus project
Quarkus has a nice command line interface that makes quick work of creating a microservice application. You can use the following command to create a new microservice:
quarkus create app --java 17 --maven com.tastybeans:catalog:0.1.0-SNAPSHOTAfter a few seconds you have a new maven-backed Java project that you can start immediately with the command quarkus dev.
Quarkus has the concept of extensions. An extension is an integration of a Java library into your Quarkus application. It usually involves some form of code generation to enable Quarkus to compile your application to a native executable and some runtime logic that makes the external library work with your application.
There are a ton of extensions available that you can add through the command line with the following command:
quarkus ext add <identifier>There are many extensions to choose from. If you’re interested in learning more, check out the website: https://quarkus.io/extensions/. We’ll cover some of the extensions in the next sections as we build the microservice.
Now that we have a project, let’s look at building some business logic for the microservice.
Application architecture
The application that I’m working on sells subscriptions for coffee beans. As part of the microservice application, I have a product catalog microservice that stores product information. It follows the structure that you see in the following picture.
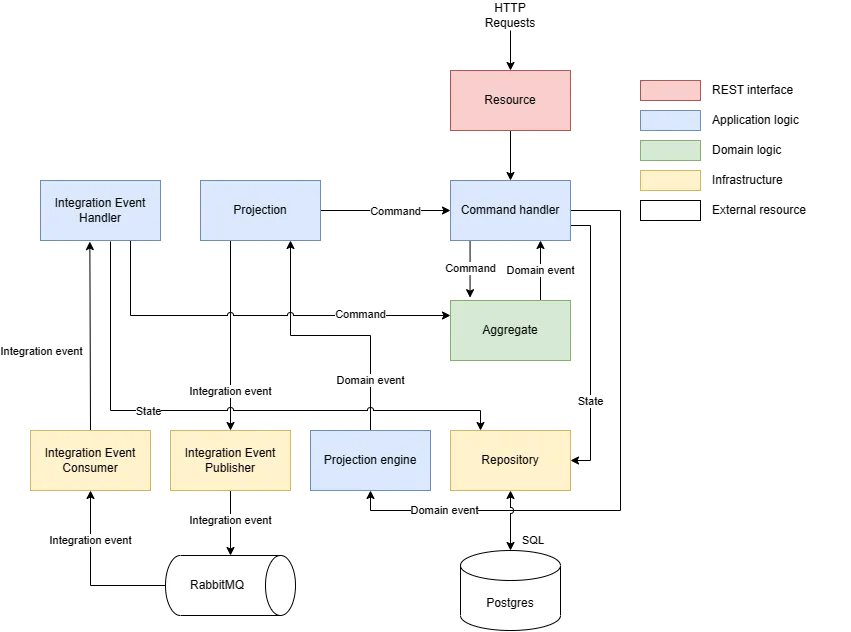
HTTP requests are sent to a Resource class, which invokes one of the command handlers. In the command handlers, the aggregate is loaded or created. After the aggregate is done processing, any domain events generated by the aggregate are passed to the projection engine to update read models or to perform other business logic.
Let’s first look at the aggregate to understand what happens when I send a command to it.
Building a basic aggregate
The main aggregate in this microservice is the Product aggregate which looks like this:
@Entity
public class Product extends AggregateRoot {
    @Id
    private String productId;
    private String name;
    private String description;
    @Embedded
    ProductSpecification specification;
    private BigDecimal unitPrice;

    public Product() {
    }

    public static Product register(RegisterProduct command) {
        var product = new Product();

        product.emit(new ProductRegistered(
                command.productId(),
                command.name(),
                command.description(),
                command.specification(),
                command.unitPrice()));

        return product;
    }

    @Override
    protected boolean tryApplyDomainEvent(Object domainEvent) {
        if (domainEvent instanceof ProductRegistered productRegistered) {
            apply(productRegistered);
            return true;
        }

        return false;
    }

    private void apply(ProductRegistered productRegistered) {
        this.productId = productRegistered.productId();
        this.name = productRegistered.name();
        this.description = productRegistered.description();
        this.specifcation = productRegistered.specification();
        this.unitPrice = productRegistered.unitPrice();
    }

    // Let out getters/setters
}
When a command handler calls the register method, a new event is emitted and then applied to the aggregate to update its state. After the event is applied, the event is stored so I can make projections for read models or integration events.
The structure of the aggregate looks a bit complicated at first, but that’s on purpose. I’m storing all the events after they happened Storing the events in a pending list makes life easier if I want to trigger logic after the aggregate is modified. It’s also great for unit-testing purposes.
Notice how I marked my aggregate with @Entity and the productId field with @Id. This maps the aggregate to a table in the database with the same name as the class. I can then use Panache with Hibernate to create a repository for my aggregate like so:
public interface ProductRepository extends PanacheRepository<Product> {
    Product findById(String productId);
}

@ApplicationScoped
public class ProductRepositoryImpl implements ProductRepository {

    @Override
    public Product findById(String productId) {
        return find("productId", productId).firstResult();
    }
}
For these annotations and the repository to work I need to add two extensions:
quarkus ext add quarkus-hibernate-orm-panache
quarkus ext add quarkus- jdbc-postgresql
The first extension adds support for Hibernate and Panache. Hibernate is an Object Relational Mapping (ORM) library that maps entities to tables in the database. Panache adds support for the Active Record and Repository pattern on top of Hibernate.
The second extension adds a JDBC driver and configuration for Postgresql to my microservice. It’s one of the many drivers supported by Quarkus. Feel free to take a look at the extensions page to find out more about supported extension for Quarkus: https://quarkus.io/extensions/.
Now that we have the domain layer, let’s look at adding command handlers next.
Adding a command handler
The command handler in our microservice connects domain logic to application services. It composes domain logic into application logic. For the register method on the Product aggregate we can implement the following command handler:
@ApplicationScoped
public class RegisterProductCommandHandler {
    private final ProductRepository productRepository;
    private final ProjectionEngine projectionEngine;

    @Inject
    public RegisterProductCommandHandler(ProductRepository productRepository, ProjectionEngine projectionEngine) {
        this.productRepository = productRepository;
        this.projectionEngine = projectionEngine;
    }

    public Product handle(RegisterProduct cmd) {
        var product = Product.register(cmd);

        projectionEngine.apply(product.getPendingDomainEvents());
        productRepository.persist(product);

        return product;
    }
}
In the handle method we take the RegisterProduct command and send it to the Product aggregate. The Product aggregate then does its magic and produces domain events. When we’re done modifying the aggregate, we’ll take the generated domain events and send them to the projection engine for further processing into, for example, integration events and read models. When that’s done, we call the ProductRepository to save the aggregate.
Quarkus uses inversion of control, so it knows how to inject instances of beans into other beans. This is demonstrated in the command handler where I’ve marked the constructor with @Inject and the class with @ApplicationScoped. The @Inject annotation tells Quarkus to look for an instance of the ProjectionEngine and the ProductRepository so I can use it in the command handler.
It’s requires few lines of code to combine various components together to build a DDD-oriented microservice in Quarkus. The strength of inversion of control gets even better in the next section when we look at the ProjectionEngine class.
Creating the projection engine
The projection engine is responsible for mapping the domain events to event handlers. I can send the list of events generated by the aggregate to the ProjectionEngine and it will take care of the rest.
The ProjectionEngine class doesn’t handle the events itself, it wants a Projection for each type of event to delegate the projection logic to. So, I need to inject a list of Projection instances into the ProjectionEngine constructor.
public interface Projection {
    boolean accepts(Object domainEvent);
    void apply(Object domainEvent);
}

public interface ProjectionEngine {
    void apply(List<Object> domainEvents);
}

@ApplicationScoped
public class ProjectionEngineImpl implements ProjectionEngine {
    private final List<Projection> projections;

    @Inject
    public ProjectionEngineImpl(@All List<Projection> projections) {
        this.projections = projections;
    }

    @Override
    public void apply(List<Object> domainEvents) {
        for (var domainEvent : domainEvents) {
            for (var projection : projections) {

                if (projection.accepts(domainEvent)) {
                    projection.apply(domainEvent);
                }
            }
        }
    }
}
The code above is delightful. Just give me a list of things and we’re up and going. One of the projections that I’ve added in my microservice a projection that’s going to translate domain events to integration events to send over RabbitMQ. I’m going to skip over the projection code itself because I rather show you what the integration with RabbitMQ looks like in Quarkus.
Sending integration events over RabbitMQ
I mentioned extensions in the beginning of this post. Let’s add one to the application: quarkus-smallrye-reactive-messaging-rabbitmq with the following command:
quarkus ext add quarkus-smallrye-reactive-messaging-rabbitmqAfter adding the extension we can start sending/receiving async messages over RabbitMQ. We’ll put it to good use to send integration events for our product catalog.
Let’s first create a new class called IntegrationEventPublisher that looks like this:
public interface IntegrationEventPublisher {
    void send(Object domainEvent);
}

@ApplicationScoped
public class IntegrationEventPublisherImpl implements IntegrationEventPublisher {
    private final Emitter<Object> domainEventsEmitter;

    @Inject
    public IntegrationEventPublisherImpl(@Channel("outgoing-integration-events") Emitter<Object> domainEventsEmitter) {
        this.domainEventsEmitter = domainEventsEmitter;
    }

    @Override
    public void send(Object domainEvent) {
        var annotation = domainEvent.getClass().getAnnotation(IntegrationEvent.class);

        if(annotation == null) {
            throw new RuntimeException(
                    String.format("Domain event %s does not have a DomainEvent annotation",
                            domainEvent.getClass().getName()));
        }

        OutgoingRabbitMQMetadata outgoingMetadata = OutgoingRabbitMQMetadata.builder()
                .withRoutingKey(annotation.routingKey()).build();

        domainEventsEmitter.send(Message.of(domainEvent, Metadata.of(outgoingMetadata)));
    }
}
In the IntegrationEventPublisher we have an Emitter<Object> instance marked with @Outgoing in the constructor. This emitter will send any data that we give it to the outgoing-integration-events channel.
To get the data to a topic on RabbitMQ we need to map the outgoing channel to a RabbitMQ adapter. I’ve added a few lines of configuration to the application.properties file for this:
mp.messaging.outgoing.outgoing-domain-events.connector=smallrye-rabbitmq
mp.messaging.outgoing.outgoing-domain-events.exchange.name=integration-events
The first line connects the RabbitMQ adapter to the channel. The second line configures the exchange that we want to publish the data from the channel to.
The IntegrationEventPublisher class has a method called send that accepts any object. In the method we’ll map the incoming data to the outgoing channel. The most basic way to send data to RabbitMQ is to call the send method on the emitter.
We, however, need to make sure that outgoing integration events have the right routing key. Otherwise RabbitMQ is not going to be happy because we’re sending events to places where they shouldn’t be going. For this purpose I created an annotation called IntegrationEvent that has a routing key.
@Target({ElementType.TYPE})
@Retention(RetentionPolicy.RUNTIME)
public @interface IntegrationEvent {
    String routingKey();
}
In the send method in the IntegrationEventPublisher, I grab this annotation and create metadata for RabbitMQ so that we add the routing key to outgoing event that we’re publishing.
The code for sending events over RabbitMQ isn’t too complicated. All I needed to do was to introduce a way to set the right routing key for each outgoing event. This routing key is, as I mentioned, important as we’ll see in the next section.
Receiving integration events from RabbitMQ
We’ve talked about sending integration events to RabbitMQ in the previous section, let’s receive some events from RabbitMQ in this section.
First, we’ll need to set up the IntegrationEventConsumer class:
@ApplicationScoped
public class IntegrationEventConsumer {
    private final List<IntegrationEventHandler> integrationEventHandlers;

    @Inject
    public IntegrationEventConsumer(@All List<IntegrationEventHandler> integrationEventHandlers) {
        this.integrationEventHandlers = integrationEventHandlers;
    }

    @Incoming("incoming-integration-events")
    public CompletionStage<Void> consume(Message<JsonObject> message) {
        for(var eventHandler: integrationEventHandlers) {
            if(canHandle(message, eventHandler)) {
                var event = message.getPayload().mapTo(eventHandler.getEventClass());
                eventHandler.handle(event);
            }
        }

        return message.ack();
    }

    boolean canHandle(Message<JsonObject> message, IntegrationEventHandler<?> eventHandler) {
        var metadata = message.getMetadata(IncomingRabbitMQMetadata.class).orElseThrow(() -> new RuntimeException("No valid metadata found"));
        var routingKey = metadata.getRoutingKey();
        var eventClass = eventHandler.getEventClass();
        var annotation = eventClass.getAnnotation(IntegrationEvent.class);

        if(annotation == null) {
            throw new RuntimeException(
                    String.format("Domain event %s does not have a DomainEvent annotation",
                            eventClass.getName()));
        }

        return annotation.routingKey().equals(routingKey);
    }
}
This class has a method called handle that accepts an incoming message. The operation is marked with @Incoming(“incoming-integration-events”). This tells Quarkus that we’ll want this method to be called when we receive messages over the configured channel.
We can map the incoming channel in the application.properties file like so:
mp.messaging.incoming.incoming-integration-events.connector=smallrye-rabbitmq
mp.messaging.incoming.incoming-integration-events.routing-keys=#
mp.messaging.incoming.incoming-integration-events.queue.name=catalog
mp.messaging.incoming.incoming-integration-events.exchange.name=integration-events
Let me explain what each of the lines mean:
- The first line connects the channel to RabbitMQ.
- The second line tells Quarkus for which routing keys we’ll accept messages.
- The third line tells which queue we want to receive messages from.
- The fourth line connects the queue to the integration-events exchange that we used earlier.
In the handle method we’re going to try and map the incoming event to an IntegrationEventHandler class. We use some clever mapping here to find out where to route the event in the application. I can recommend you look at the reactive messaging with RabbitMQ guide to get a more complete picture of what reactive messaging looks like and how RabbitMQ integrates with it: https://quarkus.io/guides/rabbitmq-reference
One more thing to do, and that’s to create a REST interface for our microservice.
Creating a REST interface in Quarkus
For REST interfaces we have a couple of options in Quarkus. You can go the reactive route or the good old regular code route. I went with the latter because I wasn’t in the mood to go reactive today.
You can add so-called Resource classes to your microservice to map incoming HTTP requests to business logic. This is what that looks like:
@ApplicationScoped
@Path("/products")
public class ProductsResource {
    private final ProductRepository productRepository;
    private final RegisterProductCommandHandler registerProductCommandHandler;

    @Inject
    public ProductsResource(ProductRepository productRepository, RegisterProductCommandHandler registerProductCommandHandler) {
        this.productRepository = productRepository;
        this.registerProductCommandHandler = registerProductCommandHandler;
    }

    @POST
    @Transactional
    @Consumes(MediaType.APPLICATION_JSON)
    @Produces(MediaType.APPLICATION_JSON)
    public Response registerProduct(@Valid RegisterProductForm entity) {
        var productId = UUID.randomUUID().toString();
        var cmd = new RegisterProduct(productId, entity.name(), entity.description(), entity.specification(), entity.unitPrice());
        var product = registerProductCommandHandler.handle(cmd);

        return Response.created(URI.create("/products/" + product.getProductId())).build();
    }

    // Let out the rest of the class
}
The ProductResource class is marked with @Path to map it to a URL segment. In the class I have a method registerProduct that accepts a RegisterProductForm parameter with the name entity. It’s good to know that incoming HTTP body content is mapped to a parameter called entity by convention. That one tripped me up a few times. The method itself is mapped with @POST so we only accept POST requests.
Quarkus REST interfaces are based on the JAX-RS standard. If you’re interested in learning more about the standard I can recommend taking a look at the standard on the Jakarta website: https://jakarta.ee/specifications/restful-ws/
Building REST interfaces with JAX-RS is similar to building controllers in ASP.NET core and controllers in Spring Web.
Running a Quarkus microservice in development
I’m going to skip over testing for now as it requires a full blog post on its own. Let’s instead look at how you can quickly iterate over your code with the live reload feature in Quarkus as I think that’s one of the key things that makes Quarkus so nice to work with.
You can start a microservice with the following command:
quarkus devThis command does a couple of things:
- First, it will boot up Docker containers for various things you’re using. For example, if you use the Postgresql JDBC driver, it will spin up a Postgres container for you. If you use the RabbitMQ integration, it will spin up a RabbitMQ container. Note: If you have multiple Quarkus apps running in dev mode, it will share the RabbitMQ instance automatically so you can integration test multiple microservices.
- Next, it will boot up your microservice with live reload enabled. When code changes, the application is either restarted or classes are replaced depending on what the change was. No need to restart or any of that nonsense.
- Finally, it will start a process that watches for changing unit-tests. When you change a test, Quarkus will automatically run the unit-test for you. When you press R on the command line, it will run all tests for you.
The container behavior is controlled by dev services, a feature in Quarkus that makes it easier for developers to work on microservices on their development machines. Dev services get automatically configured for you if you didn’t specify connection strings yourself. If you have a connection string for your database and connection settings for RabbitMQ, the existing instances are used.
I think the dev command is a great addition to Quarkus. It works well with editors like VSCode and IntelliJ. It’s highly recommended you try it out.
Other tips and tricks
There are too many features to name in a single post so I may have to write more about Quarkus in the future. I wanted to leave you with a few features that I think are worth checking out once you’ve build some initial logic in your microservice:
- Quarkus Flyway extension: This extension makes it possible to write SQL migrations that get applied during startup of your microservice. I think this is a must have if you’re serious about microservices and relational databases.
- Quarkus OpenAPI extension: This extension allows you to expose an OpenAPI specification of your service. It makes it just a little bit easier for other developers to integrate with your microservice.
- Quarkus Micrometer extension: Modern microservices often expose metrics to make it easier to learn about bottlenecks in your microservice landscape. This extension makes adding metrics easier.
- Quarkus Smallrye Health: This extension adds health checks to your service. Essential if you’re running on Kubernetes!
Summary
And that’s it, my first DDD inspired microservice with Quarkus. I know I covered a lot of ground in a very short amount of time. But I think you’ll find that the guides on the Quarkus website offer plenty of additional explanation to get you going.
I hope I inspired you to give this framework a try!
The source code for my demo project is up on Github.