Are open source large language models the future? Let's find out with an example

Since the introduction of GPT-3.5 there’s been a race in the open-source community to come up with models that match the performance of the models produced by OpenAI. The main reason behind this race is that many people feel that it’s not a good idea to use the models produced by OpenAI. There are three main arguments as to why:
- OpenAI is not transparent about the data that’s used in the model and the way the model is trained. We don’t know which tasks will work well. We also can’t tell what bias is in the dataset.
- OpenAI controls access to the model through a paid subscription model. It’s fair that we’re paying for services offered. But they decide who gets access to the models.
- The models created by OpenAI are very inefficient. You need multiple GPUs to host the model. This can only be reasonably done in the cloud.
The answer to all these arguments is to go open source. In many cases you get to see what data is used by the team that trained the model, and how the model is trained. Because the models aren’t too large, you can fine-tune the model for specific tasks more easily. Most of the open-source models today can be reasonably hosted on a single GPU. In some cases, you’re going to need two GPUs.
Using desktop hardware reduces the carbon footprint and makes the whole use case much more reasonably priced for many organizations. Also, it allows you to keep everything in house if you want.
While you can use desktop hardware, it’s going to be quite a heavy setup.
System requirements
Hosting a language model on your own hardware requires serious equipment. I’ve tested various large language models on my machine which has this setup:
- CPU: Core i9 13900K
- Memory: 64GB DDR5
- GPU: RTX4080 with 16GB dedicated memory.
- SSD: Samsung 990 Pro 2TB
With this setup I was able to run all sorts of models. The GPU will have the biggest impact on what you can run. Most models will work best when hosted on the GPU. You can sometimes split the model between your GPU and CPU. But the performance will drop quite hard.
Before you start hosting your own LLM, make sure to check what you can host in the LLM database: https://www.hardware-corner.net/llm-database/
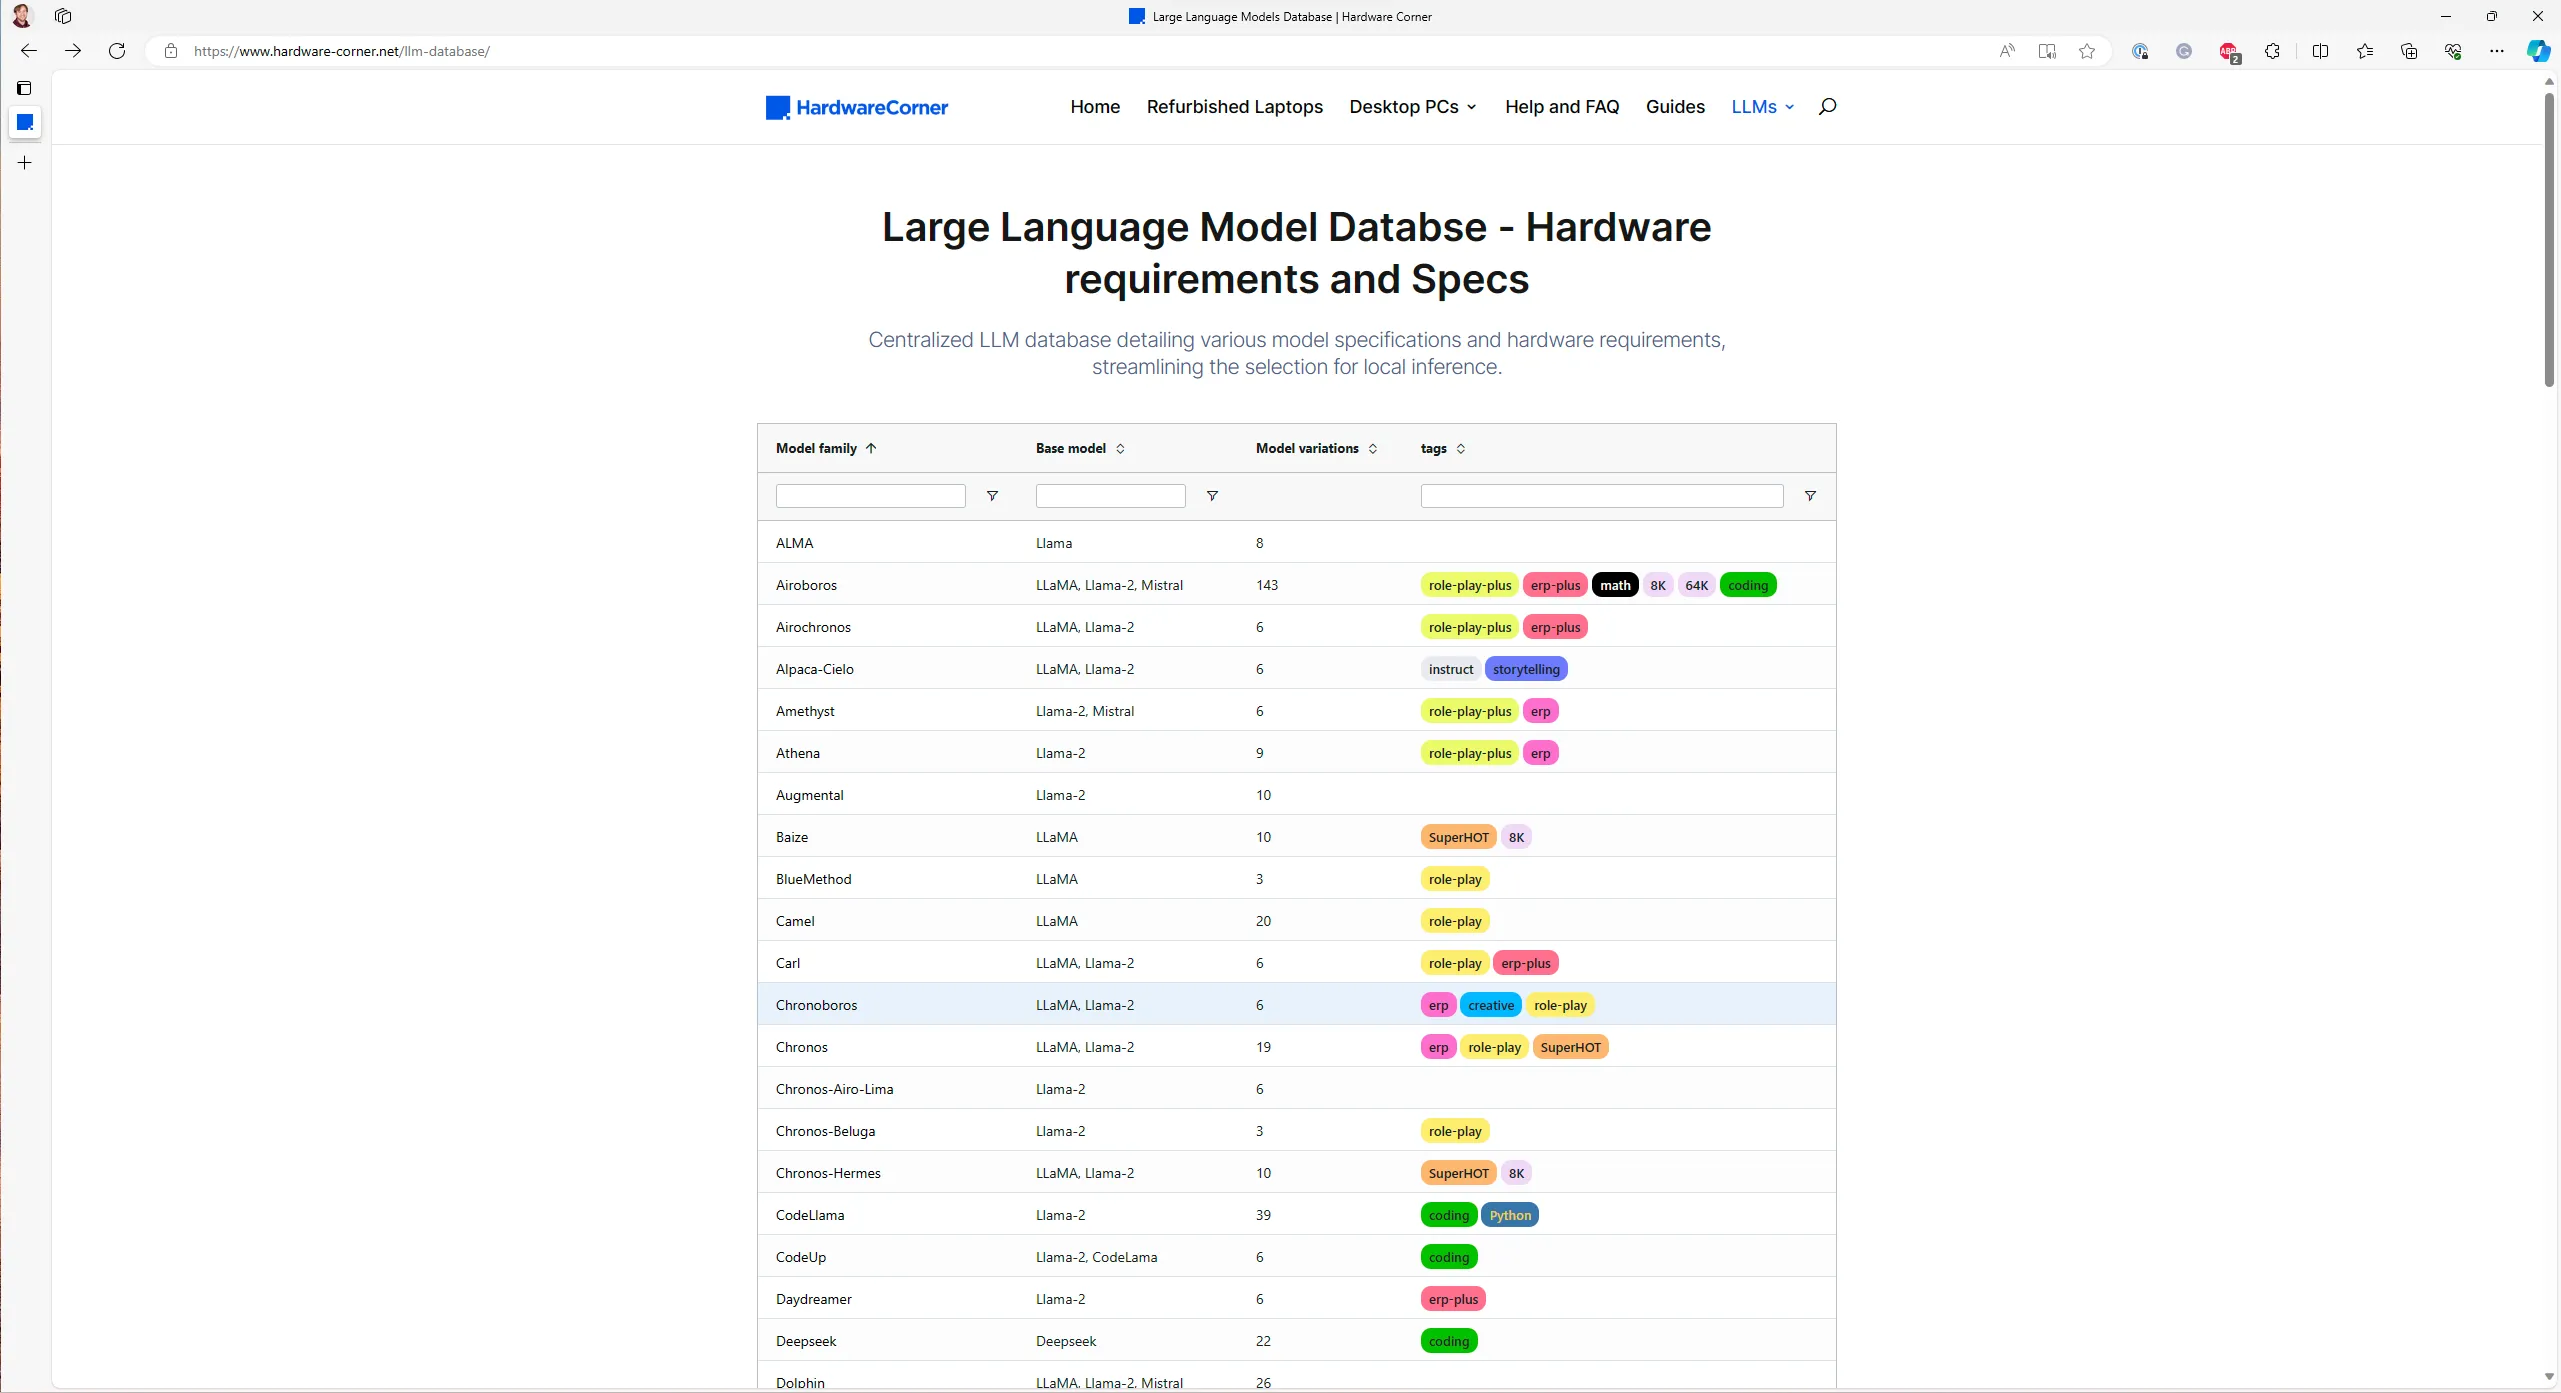
The LLM database has been invaluable for me to evaluate the types of models I can run. In the list you select the type of model you want to check out. The database will show various variations of the selected model architecture.
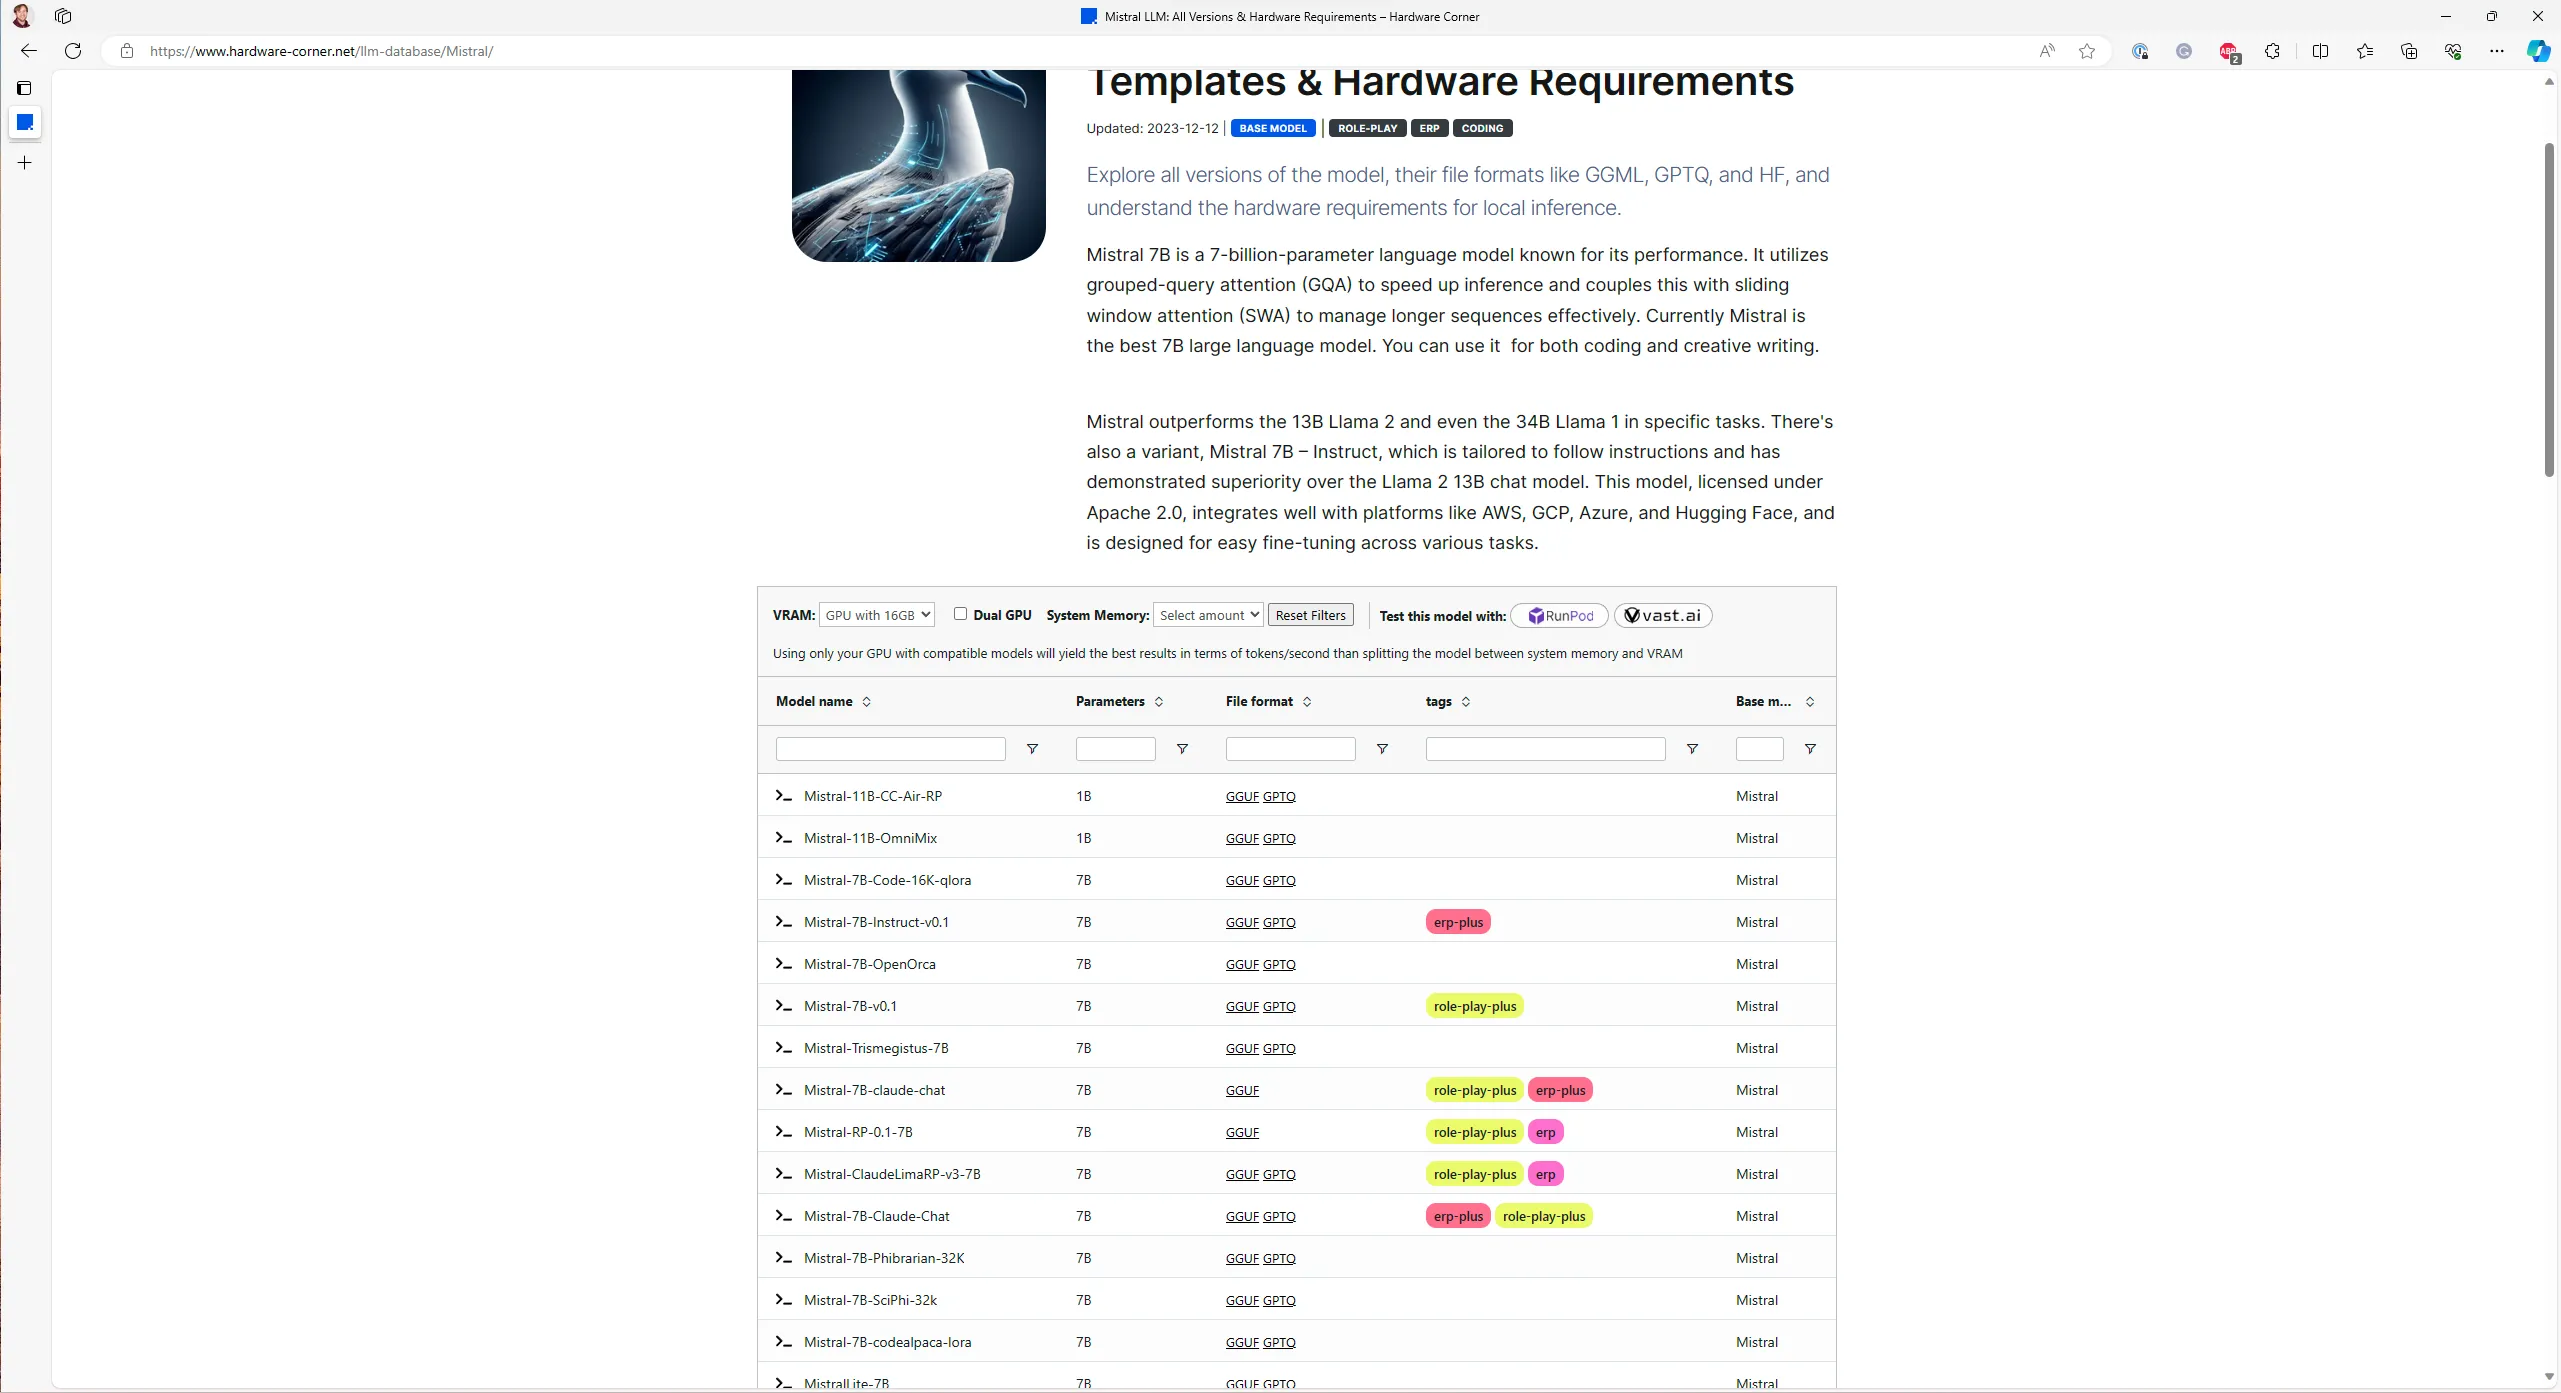
To see what you can host, select the GPU from the dropdown menu at the top of the table. The list will be filtered on what your GPU is capable of hosting. Make sure to also set the available system RAM.
It’s worth noting that not all open-source models are included in the database. The set of available models is growing by the minute, but most models are a derivative of one of the models in the database.
Configuring your first language model
As with most machine-learning applications, open-source language models are hosted with Python. I’ve tested everything here on Arch Linux, because most of this stuff doesn’t work well on Windows.
Installing required packages
To set up a model, you’ll need a Python environment with the following packages:
Loading the language model
After installing these packages, you can get access to a language model using the following python code:
import torch
from transformers import AutoModelForCausalLM, AutoTokenizer

model_id = "argilla/notus-7b-v1"
device = torch.device("cuda")
tokenizer = AutoTokenizer.from_pretrained(model_id)
model = AutoModelForCausalLM.from_pretrained(
    model_id,
    device_map=device,
    torch_dtype=torch.bfloat16,
)
This code performs the following steps:
- First, we need to detect if you have a graphics card available.
- Next, we load the tokenizer for the model.
- After that, we load the model onto the graphics card.
Note that we’re using half precision floating points to load the model. The quality of the responses is a little lower than will full precision (float32) floating points. However, it will be faster to generate responses with half precision floating points.
Working with half precision floating points only works on recent graphics cards. You can leave the torch_dtype argument out if your graphics card doesn’t support float16 instructions.
Generating a response
Now that we’ve loaded the model, we can generate a response. The following code shows how to generate a response with the model:
messages = [
    {
        "role": "system",
        "content": "You're a friendly assistant. You help people generate content for their blog.",
    },
    {
        "role": "user",
        "content": "Please generate an outline for a blogpost about using open source lanugage models",
    },
]

inputs = tokenizer.apply_chat_template(
    messages,
    tokenize=True,
    add_generation_prompt=True,
    return_tensors="pt",
).to(device)

output = model.generate(
    inputs=inputs,
    max_new_tokens=2500,
    do_sample=True,
    temperature=0.7,
    top_p=0.98,
)

response_text = tokenizer.decode(output[0], skip_special_tokens=True)
This code performs the following steps:
- First, we construct a conversation of two messages. This includes a system prompt with instructions on what role the model should play and a user prompt that include a command to generate on outline for a blogpost.
- Then, we encode the messages into tokens stored as tensors on the graphics card.
- After that, we ask the model to generate a response for the tokens.
- Finally, we decode the returned tensors into text using the tokenizer.
The output looks like this:
<|system|>
You're a friendly assistant. You help people generate content for their blog.
<|user|>
Please generate an outline for a blogpost about using open source lanugage models
<|assistant|>
Title: Unleashing the Power of Natural Language Processing: A Comprehensive Guide to Using Open Source Language Models in Your Project

1. Introduction
- Briefly introduce natural language processing (NLP) and its applications
- Highlight the benefits of using open source language models (OSLMs)

2. Understanding Language Models
- Define what language models are and their role in NLP
- Explain the different types of language models (statistical, neural, rule-based)
- Discuss the advantages and disadvantages of each type

3. Popular Open Source Language Models
- Present a list of commonly used OSLMs (BERT, GPT, XLM, T5, etc.)
- Explain their features, use cases, and applications
- Provide examples of how each language model has been implemented in real-world scenarios

4. Getting Started with Open Source Language Models
- Walk through the process of setting up an environment for OSLMs
- Discuss the different programming languages that can be used (Python, Java, etc.)
- Explain the different tools and libraries that can be used for training and evaluating models (Hugging Face Transformers, PyTorch, TensorFlow, etc.)

5. Fine-Tuning and Customizing Language Models
- Explore how OSLMs can be fine-tuned and customized for specific tasks and datasets
- Provide step-by-step instructions on how to fine-tune and evaluate models
- Discuss the importance of data preprocessing and cleaning

6. Training and Evaluating Language Models
- Discuss the different metrics that can be used to evaluate the performance of NLP models
- Present a list of evaluation datasets and benchmarks (GLUE, WMT, etc.)
- Provide guidelines on how to train and evaluate language models effectively

7. Deploying Language Models in Production
- Explore the different deployment options for NLP models (on-premises, cloud, etc.)
- Discuss the importance of monitoring and maintaining models
- Provide best practices for deploying and maintaining models in production

8. Conclusion
- Summarize the key takeaways from the guide
- Highlight the potential future developments in OSLMs and NLP
- Provide resources for further learning and exploration.
Note that the output contains special markers that you need to parse to turn the sequence into a structured conversation. The model doesn’t know about JSON or other data formats, so you’ll have to build that part.
It will take several seconds up to a minute to get a response. This is normal for large language models, but it’s not the greatest experience. To get a better experience, you’ll need to stream the tokens as they’re generated.
Streaming language model responses
Language models are slow as you can tell from the end of the previous section. This is why OpenAI, and our internal chat agent are streaming responses. It doesn’t make the model faster, but it greatly improves the user experience.
To stream responses from the model, you’re going to need to use a Streamer component. You can configure one using the following code:
from threading import Thread

import torch
from transformers import AutoModelForCausalLM, AutoTokenizer, TextIteratorStreamer

model_id = "argilla/notus-7b-v1"
device = torch.device("cuda")
tokenizer = AutoTokenizer.from_pretrained(model_id)
streamer = TextIteratorStreamer(tokenizer)
model = AutoModelForCausalLM.from_pretrained(
    model_id,
    device_map=device,
    torch_dtype=torch.bfloat16,
)

messages = [
    {
        "role": "system",
        "content": "You're a friendly assistant. You help people generate content for their blog.",
    },
    {
        "role": "user",
        "content": "Please generate an outline for a blogpost about using open source lanugage models",
    },
]

inputs = tokenizer.apply_chat_template(
    messages,
    tokenize=True,
    add_generation_prompt=True,
    return_tensors="pt",
).to(device)

generator_thread = Thread(
    target=model.generate,
    kwargs=dict(
        inputs=inputs,
        max_new_tokens=2500,
        do_sample=True,
        temperature=0.7,
        streamer=streamer,
        top_p=0.98,
    ),
)

generator_thread.start()

for fragment in streamer:
    print(fragment, end="")
This code does the following:
- First, we introduce a streamer component.
- Next, we change the code, so the generation happens on a separate thread.
- Finally, we iterate over the streamer to collect the response.
By separating the generation code into a separate thread, we can let the model produce tokens while we’re doing other stuff on the main thread. On the main thread we collect tokens that were produced by the model.
This by itself isn’t very useful. You’re going to have to feed the tokens to the client via a streaming connection like gRPC, server-sent events or a websocket. I’ll leave that out for now.
Summary
In this post we covered how to use open-source large language models on your own hardware. We’ve covered most of the basics: Loading a model, generating a response, and streaming the response to improve perceived performance.
There’s a lot more to using large language models though. It’s important to note that open-source models lack the features that OpenAI and Microsoft offer.
Open-source language models don’t have guardrails. You need to add those yourself. It can require fine-tuning if the makers of the model didn’t spend time training the model with guardrails.
It’s also good to add a separate content moderation filter to your model implementation. The guardrails, even if they’re included, aren’t enough to make your application safe to use in public use-cases.
Finally, make sure you’re prepared to spend extra time setting up your environment. While the code in this blogpost produces a working implementation it’s not complete. Aside from guardrails, you’ll also need to tune the prediction performance and write code to integrate the model further into your solution.
Having said that, I hope this post gave you useful insights into using open source large language models!