Spice up PowerShell with a file finder

It’s vacation time, so I allowed myself to mess around with my PowerShell configuration. I built a file finder in PowerShell with a few open source tools. I think it’s awesome, but I’m also curious what you think.
This post covers the process for building a file finder from start to finish including a nice preview of a selected file. Let’s get started with a short introduction to the PowerShell profile script and how to edit it.
Before we start, how to edit your profile script
It’s important to understand that all code in this post goes into your PowerShell profile script. You can edit your profile script using the following command:
code $profileAfter editing, you can save the profile script and reload the terminal to activate the new functions. Alternatively, you can use the following command to reload the profile script:
. $profileI recommend keeping the profile script open in VS Code or another editor of your choice. Let’s move on to building the actual file finder.
Building the file finder
To create a functional file finder, we’ll need a function to select a file, and a function to handle the file selection. We’ll start by creating the file selection logic.
Locating files with fzf
The basis for the file finder is the open source tool fzf. It’s a fuzzy finder that can quickly filter through a list
of files and/or directories. I combined it with fd, a tool that can quickly list out files and directories with
specific filters.
Before we can build a basic file finder, we need to install two tools:
winget install junegunn.fzf
winget install sharkdp.fd
The basis of the file finder is the Find-File function which you can find below:
function Find-File {
    $file = fd --type file --follow --exclude .git | fzf
    return $file
}
Add this function to the profile script and save it.
You can use the function from the terminal when you reload your profile script. When you enter Find-File in your
terminal it will open up the fzf window and allow you to find a specific file. When you press ENTER, you’ll get the
path to the file.
Now this function doesn’t do much on its own, but it’s an important first step towards building the file finder. The next step is to do something useful with the file. For example, edit it in VS Code.
Handling file selection
When you select a file in the Find-File function you’ll need to handle that selection in some way. In this step, we’ll
add another function called Invoke-FileAction that we’ll call to select what to do with the chosen file.
Add the following function to your profile script:
function Invoke-FileAction ($Path) {
    $commands = @{
    "Edit file in Visual Studio Code" = { code $Path }
    "Delete file"                     = { Remove-Item -Recurse -Force $Path }
  }

    $selected_command = $commands.Keys | fzf --prompt "Select action >"
    &$commands[$selected_command]
}
The Invoke-FileAction function accepts a path to a file. It runs the fzf command with a list of commands you can
choose from. When you choose one of the commands, we’ll execute the command on the provided $Path.
You can expand the file management options by adding new key-value-pairs to the $commands dictionary.
Make sure to save and reload your profile script. You can test the function by running
Invoke-FileAction -Path <path-to-a-file> in your terminal.
Let’s combine the file selection and file management functions into a fully functional file finder.
Combining file selection and selection handling
We need one more function to build the file finder, Invoke-FileFinder, which will combine the two functions we
wrote in the previous sections. You can find the content of the function below:
function Invoke-FileFinder() {
    $file = Find-File

    # Make sure we selected a file at all.
    if (!$file) {
        return
    }

    # Make sure we have a valid file path.
    if(Test-Path $file) {
        Invoke-FileAction -Path $file
    }
}
Nobody is going to write Invoke-FileFinder on the terminal, but I’ve got a fix for that. We can bind a keyboard
shortcut to the function using the following code:
Set-PSReadLineKeyHandler -chord "ctrl+f" -scriptblock {
  [Microsoft.PowerShell.PSConsoleReadLine]::RevertLine()
  [Microsoft.PowerShell.PSConsoleReadLine]::Insert("Invoke-FileFinder")
  [Microsoft.PowerShell.PSConsoleReadLine]::AcceptLine()
}
The function Set-PSReadLineKeyHandler binds a key combination to a script block or built-in function.
We use the -ScriptBlock argument to specify a set of commands to execute:
- First, we’ll clear the current command that’s next to the prompt.
- Next, we’ll enter the command
Invoke-FileFinder. - Finally, we’ll accept the input.
Add the code to your profile script and reload the terminal to bind the Ctrl+F key combination to the file finder.
You may be wondering why we’re executing the file finder in this specific way. Wouldn’t it be nicer to just
call Invoke-FileFinder.
While testing, I found that my preview command wouldn’t work if I invoked the file finder directly from the keybinding.
I’m unsure why it doesn’t work, but I found that entering the command through the PSConsoleReadline object works.
Now that you have a working file finder, let’s make it even more useful with file previews.
Adding file previews to the file finder
Most people will find it useful to have some kind of preview of the file they’re selecting in the file finder. So let’s explore adding that next.
For the file preview to work, I’d like to use bat. This is an alternative to the
cat command with a lot more options. It can list file contents with syntax highlighting, scrolling, line numbers, and
even changes you made to the file.
Execute the following command to install bat on Windows 11:
winget install sharkdp.batNext, modify the Find-File function in your profile script to look like this:
function Find-File {
  $file_path = fd --type file --follow --exclude .git |
  fzf --ansi --preview 'bat --color=always {} --style=numbers,changes'

  return $file_path
}
We’re still using fd to list the files in the current directory and below. We modified the fzf command to include
two extra options:
- First, we added
--ansito enable colored output for the preview window. - Finally, we added the
--previewoption to set a command for previewing file content in the preview window.
The preview is generated using bat. We force the command to always use colored output, so we get nicely formatted
output in the preview window.
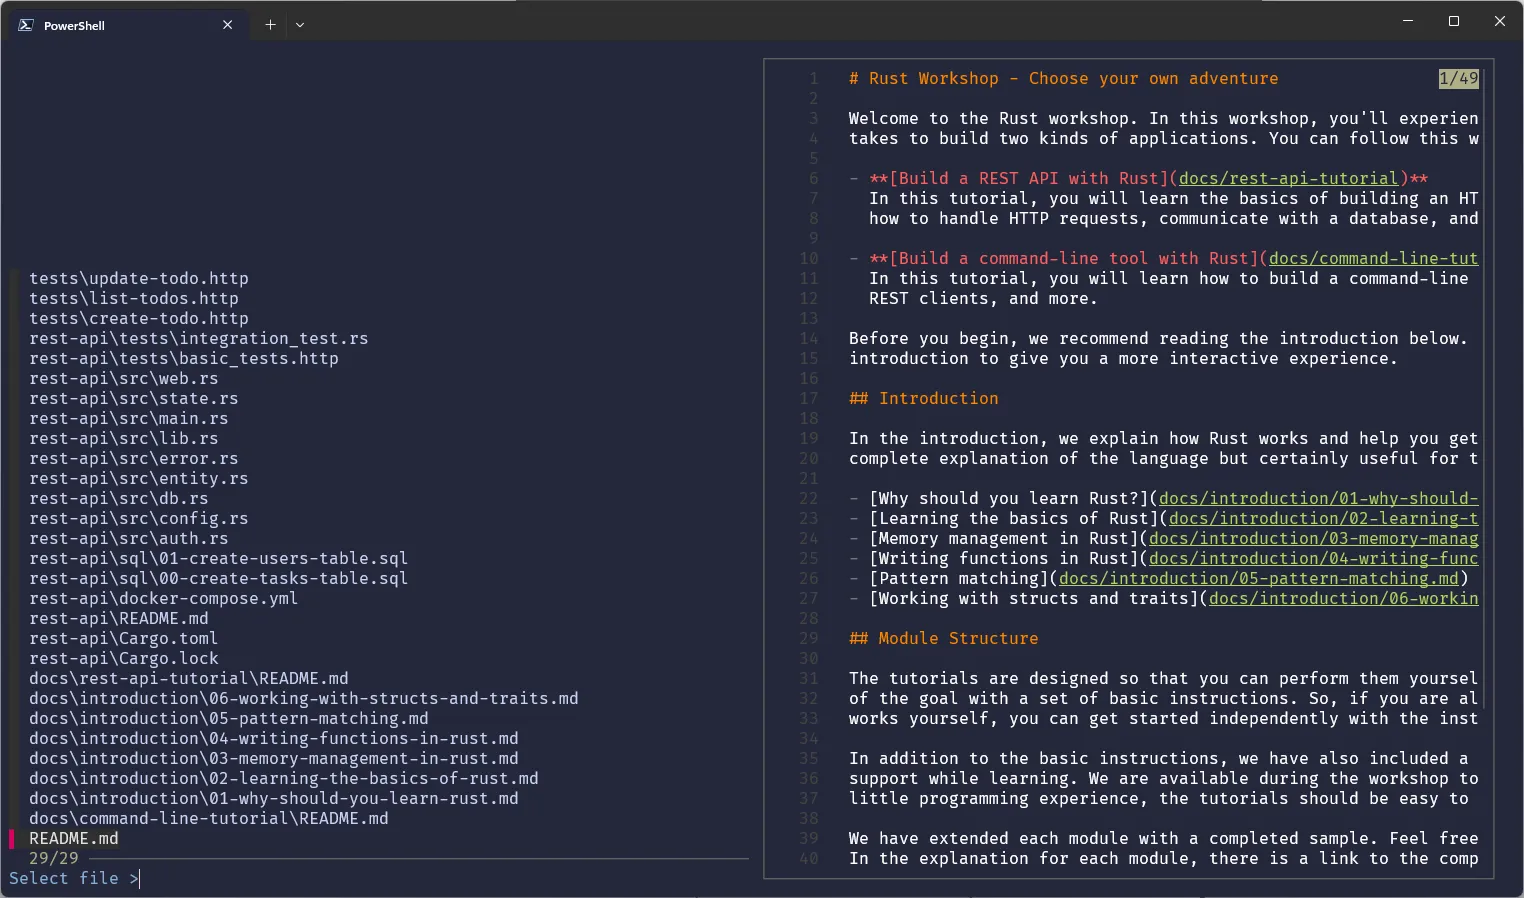
Make sure to save your profile script and reload it. When you press Ctrl+F in your terminal you should get a window that looks like this:
Conclusion
In this post you learned how to build a file finder in PowerShell with the help of fd and fzf. We also
covered how to bind a keyboard shortcut to the file finder. Finally, we covered how to use bat to generate a preview
for the selected file in the file finder.
Let me know in the comments if you find this PowerShell trick useful!