How to build a game with Unity - Part 2

Welcome to this series of blog posts about building a game with Unity. In this series we’re going to explore a fun vacation project that my son and I worked on in summer 2022.
In this blogpost we’ll discuss basic 2D level design using tilemaps and tilesets. We’ll cover the following topics:
- How do 2D tile based levels work in Unity?
- Creating a tile palette
- Setting up grid with a tilemap
- Working with layers in your level
- Fixing graphical issues in tilemaps
Let’s get started by learning about 2D tile-based levels in Unity.
How do 2D tile based levels work in Unity?
There are numerous options to build levels in Unity. One of them is using a tile-based approach. Building a level using tiles is a nice technique when you’re building a 2D game.
Tile-based levels use tiles to build the structures in the level. A tile is made out of an image called a sprite. The sprite image is loaded from a larger image called a tile palette.
Since you typically need only one tile palette to build a level, you’re going to save on performance as the game engine only needs to load one image to build the level.
Let’s start working on a tile-based level by creating a tileset first.
Creating a tile palette
Before you can create a tile-based level in unity, you’ll need to set up tile palette.
For this post, we’re going to assume that you have the Sprout land asset package on your machine.
Let’s start by importing an image that will be part of our tile palette.
Importing the resources for the tileset
First, unpack the Sprout Land asset package on your machine. In the Sprout land asset package you’ll find a folder called Tilesets which contains a number of tilesets to work with. We’re going to get started with Grass.png.
Let’s import the grass image into the project:
- Right click in the Project window and select Create -> Folder.
- Name the new folder Resources.
- Open the Resources folder in the project window and right click. Choose Import new asset.
- Browse to where you unpacked the assets package and choose the file Tilesets\Grass.png.
You should now have the grass tileset in your project window under Resources. Next, we need to convert the image into a tile palette.
Converting the image to a tileset
To convert the imported grass image into a tile palette, select it in the Project window.
When you’ve selected the image in the Project window, the inspector shows you the properties of the Grass image.
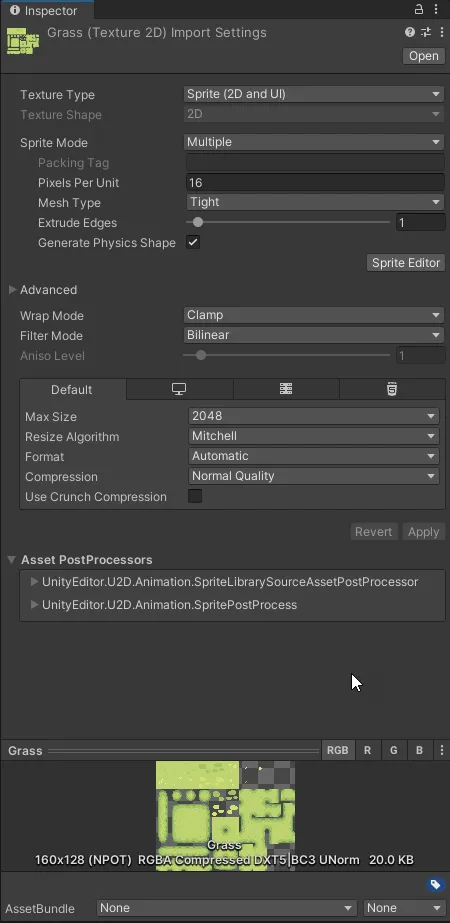
There are a couple of properties that are worth mentioning here:
- Texture type: Shows you how the image is used. You can use images as textures for 3D objects, normal maps, 2D sprites, and a number of other ways. Since we’re building a 2D project, it will show as a 2D sprite.
- Sprite mode: This will tell you how the image is used. When the sprite mode is set to single you can use the image as a single sprite in the game. When the sprite mode is set to multiple you can use parts of the image as a sprite.
- Pixels per unit: This determines how many pixels per element are used in the image. If you created an image that is meant as a 16x16 sprite you’ll want to set the value to 16. If you’re sprites that are larger, you’ll have to configure a different value here. For images containing multiple sprites you set the value to the size of an individual sprite.
To create a good tile palette, we’ll need to configure the following properties:
- Sprite mode: Multiple
- Pixels per unit: 16
A tile palette contains multiple tiles, so we need to cut out multiple sprites from the image. The image is made out of 16x6 cells for the different tile types.
Once we’ve configured the properties, we can apply the changes by hitting the apply button in the inspector.
After configuring the image, we can slice the image into individual tiles.
![]()
Follow these steps to slice the images in the sprite editor:
- Click the Sprite Editor button in the inspector window.
- In the sprite editor window, click the Slice menu item.
- From the Type dropdown, select Grid by cell size
- Enter the value 16 for X and Y
- Click the slice button.
You’ll end up with the image being sliced as shown in the image above. Once you’ve sliced the image, you can click on the Apply button in the top right corner of the Window to save the changes.
Creating the tile palette
In the previous section we sliced our image into individual sprites. You can use these sprites for a number of things. For example, you can use them to create animations or stateful objects in the game.
We have to turn the sliced sprites into a tile palette before we can paint a level with them.
Let’s start by creating a tile palette first. Follow these steps to create a tile palette:
- In the Project window, add a folder called Tiles.
- In the new folder, right click and choose Create -> 2D -> Tile palette -> Rectangular
- Give the new palette the name Landscape
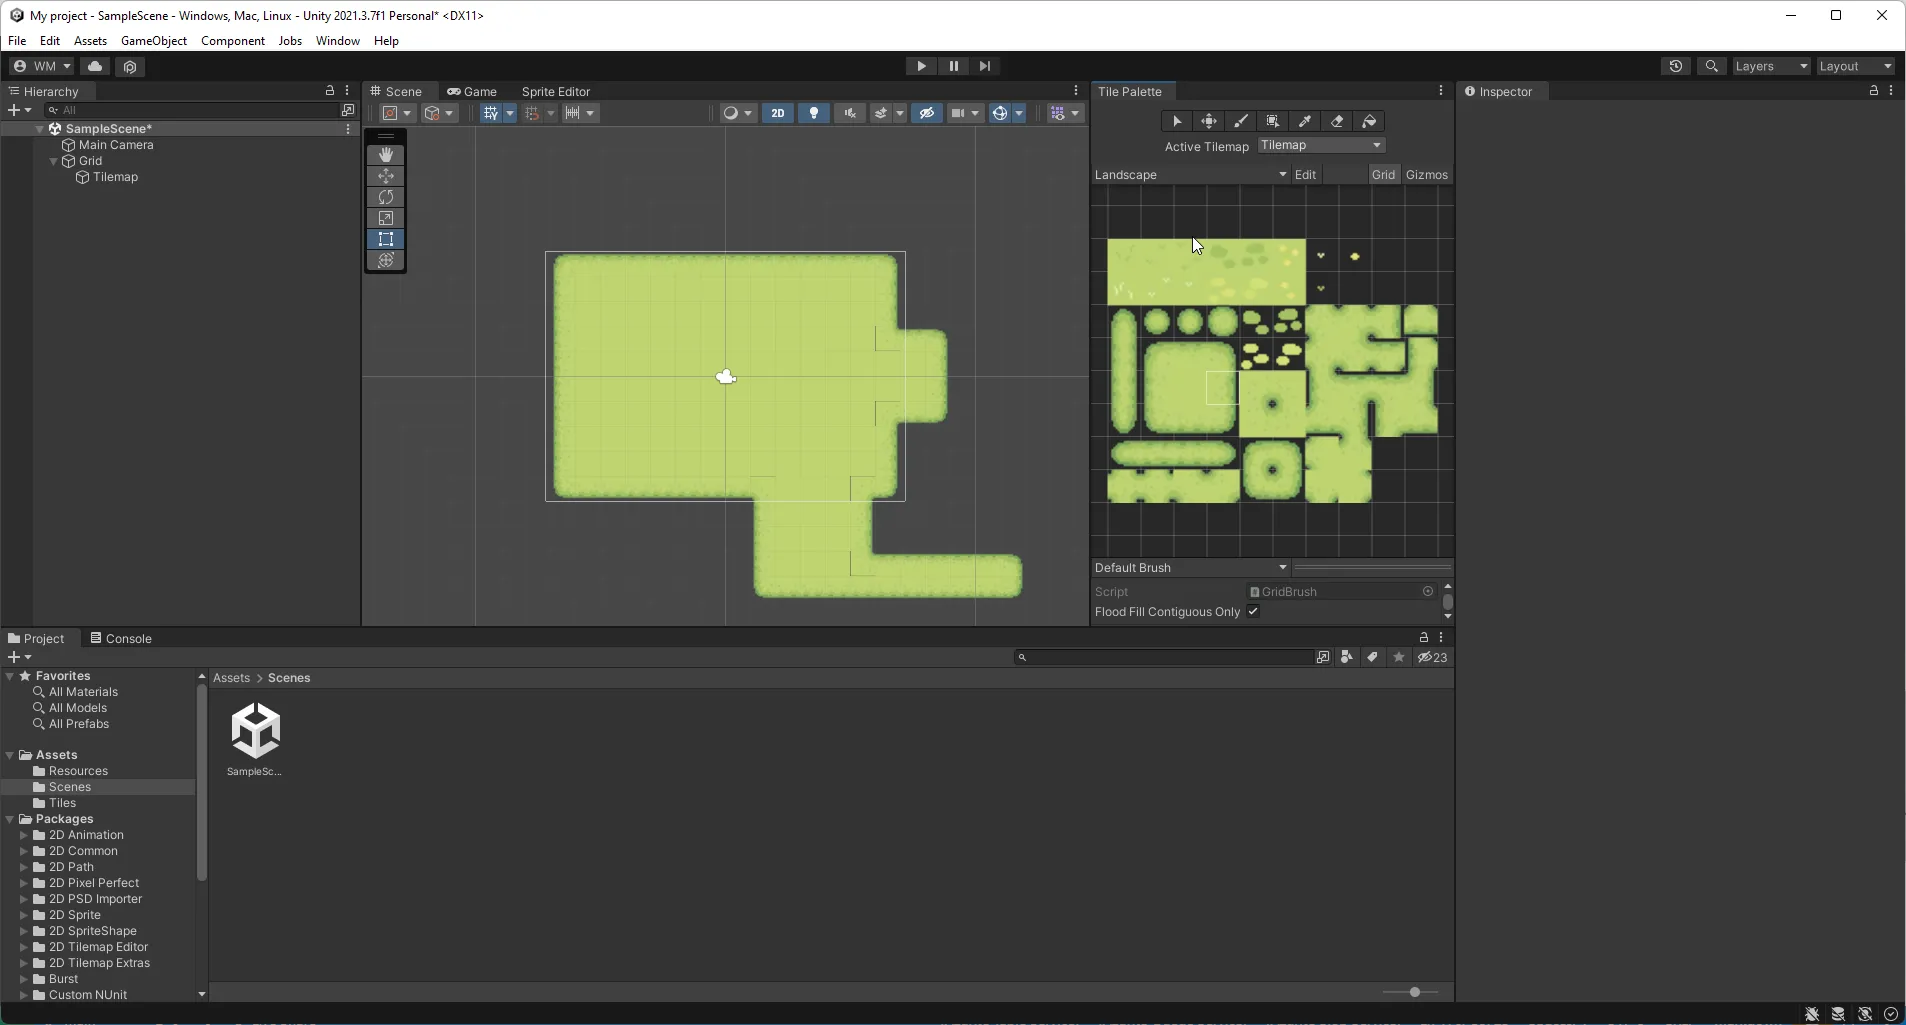
Next, navigate to the menu Window -> 2D -> Tile Palette. Drag the window next to the Scene tab in the middle of the screen so you end up with a layout that looks like the image below.
To add the sliced sprites to our tile palette, we need to drag them from the Project window to the Tile palette window we just docked. You can drop the tiles in the middle of the window.
When you’ve dropped the tiles in the Tile palette window, Unity will ask you where to save the individual tiles. You can store them in the Tiles folder.
After you’ve dragged the tiles in and saved them, they will show up like in the previous image.
Now that we have the tile palette ready, let’s paint!
Setting up grid with a tilemap
We’ve got a tile palette ready to go, now we need a surface to paint on. We can set up a grid with a tilemap by following these steps:
- Double-click the SampleScene from the Scenes folder in the Project window.
- Right click SampleScene in the Hierarchy window and choose Game object -> 2D object -> Tilemap -> Rectangular
You’ll get two things in the Hierarchy window: A grid and a tilemap. The grid will take care of the layout of the tiles. The tilemap itself works as a layer in the grid.
When you’re going to design a level using tiles, you’ll quickly find that you need to layer tiles on top of eachother to create an interesting level structure. This is why you can have multiple tilemaps.
For now, let’s start painting the first layer of tiles in the game. Select the paint brush in the Tile palette window and paint on the tilemap in the main window.
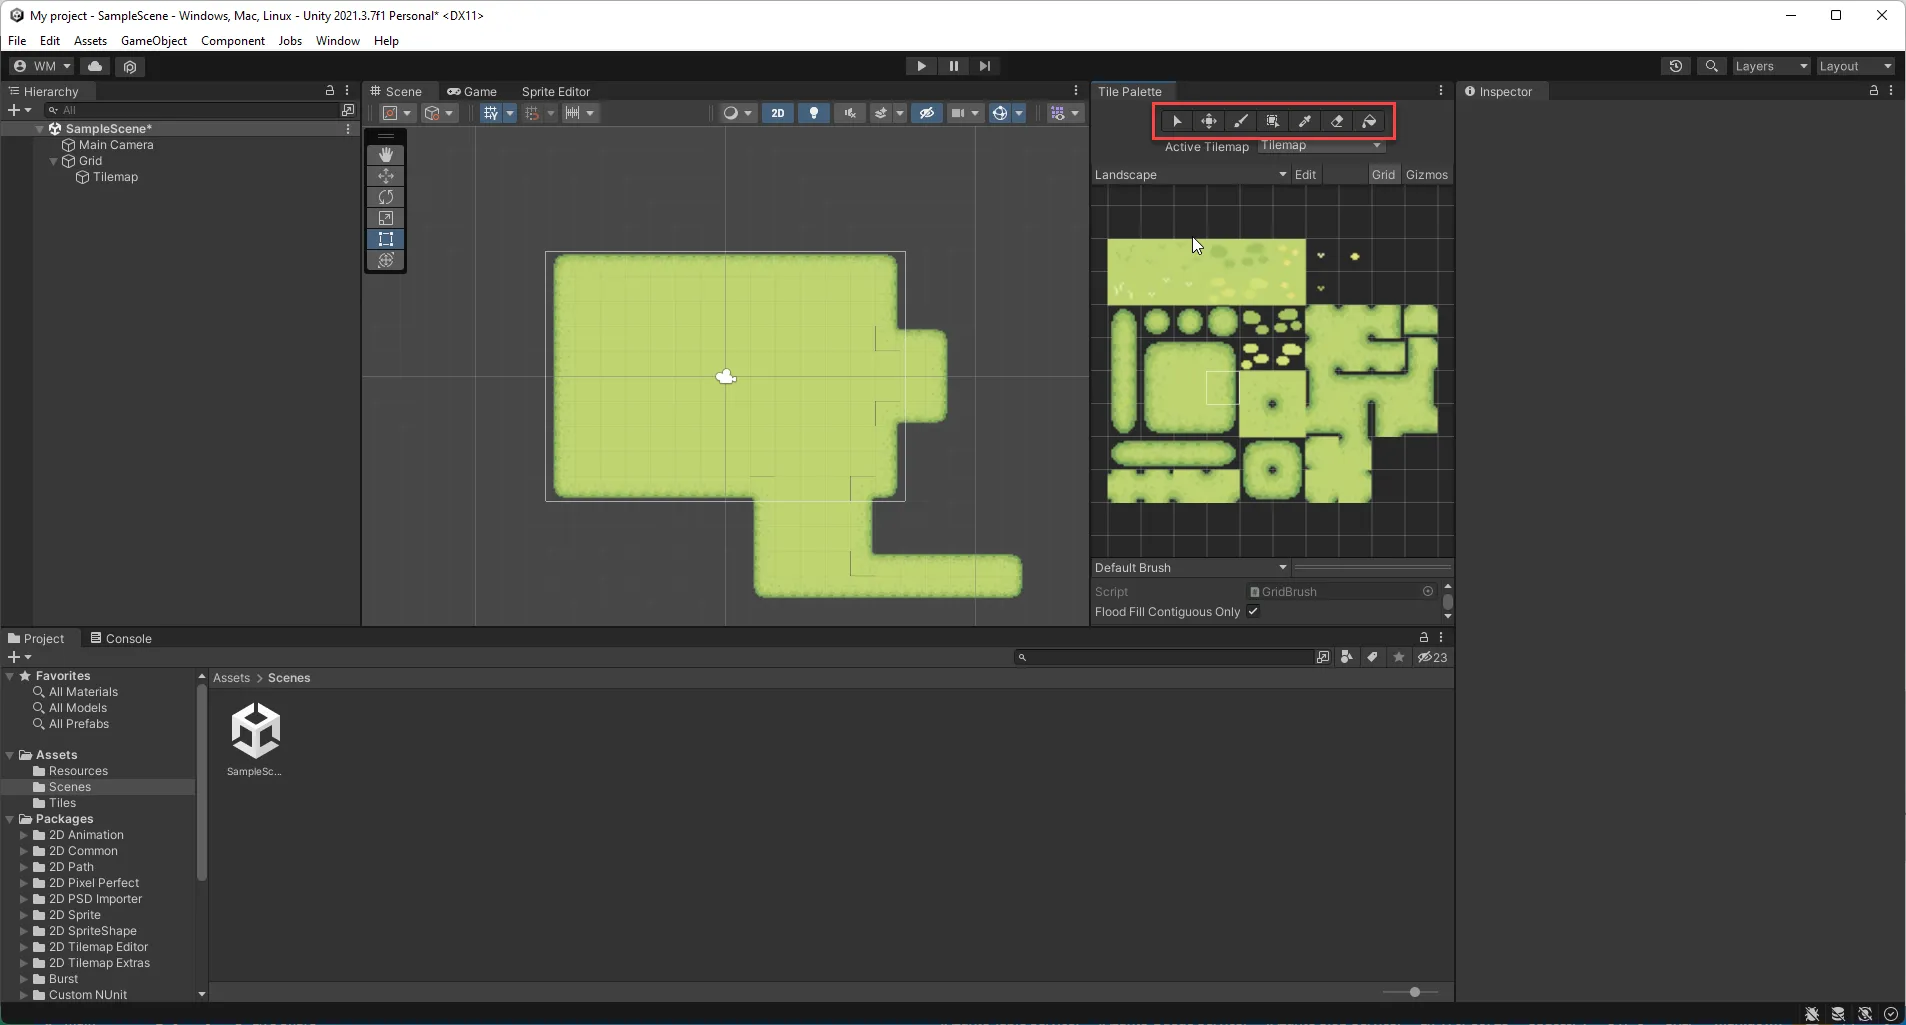
Painting is useful when you want to place individual tiles. If you want to create larger surfaces you can use the area tool, or the paint bucket.
You can remove tiles by pressing Shift when using any of the tools in the Tile palette window.
Once you have a nice grassy maedow, let’s take a look at adding more details.
Working with layers in your level
In the previous section we’ve painted a small level which may or may not be very interesting to walk around on. So let’s expand the level with another layer.
You can add another tilemap by right clicking the Grid node in the Hierarchy window and selecting Game object -> 2D object -> Tilemap -> Rectangular.
After clicking the menu item, another layer appears in the Hierarchy. Which we need to give a name to make it easy to find. We’ll also need to configure how the layer is sorted.
Select the new Tilemap, and take a peek at the Inspector window. It should list the properites for the new Tilemap.
In the Inspector window, change Order in layer property to 10.
The Order in layer property controls the sorting of the various layers in a 2D game. Many game objects will have the Order in layer property. As do our tilemaps.
The first tilemap we created has order 0. The new one needs a order higher than zero to be visible on top of the original one. If you’re ever running into invisible objects, you may want to check the Order in layer property.
Now that we have the layers sorted we can expand the level design with more details by painting more tiles.
The level is getting there slowly, but there’s one big problem. The graphics are glitchy and not very sharp at this point.
Let’s fix that by optimizing the graphics settings.
Fixing graphical issues in tilemaps
Unity is optimized for 3D games and uses things like anti aliasing to make the edges of objects look smoother in game. This working against us at this point.
There is a good solution though. We need to change two things to make our graphics look sharp:
- First, we need to disable anti-aliasing in the project settings
- Next, we need to disable image filtering for our grass image.
Let’s change the anti-aliasing first.
Disabling anti-aliasing
Follow these steps to disable the anti-aliasing:
- Open the menu Edit -> Project settings and search for anti aliasing.
- For each of the graphics profiles, disable the setting.
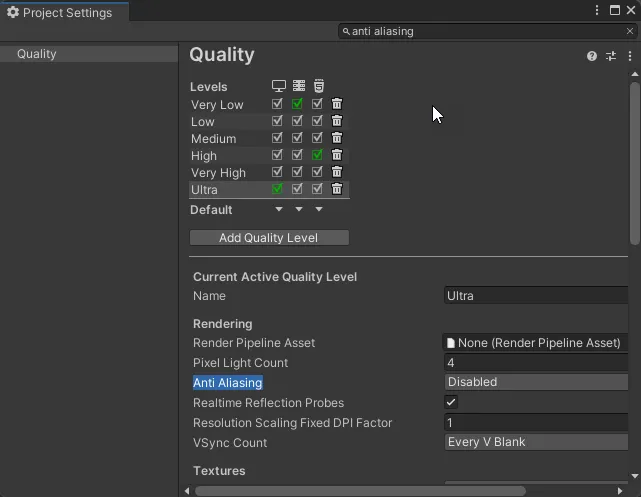
Disabling anti-aliasing makes the edges sharper, but that’s perfect for a pixel-art game. Keep in mind though, it’s not for everyone. So you may have to leave this on.
Now that you have anti-aliasing disabled you need to optimize the graphics next.
Disabling texture filters
To disable the texture filters for the grass, we need to edit the properties of the grass image. Follow these steps to disable the texture filtering for the grass image:
- Select the grass image in the Project window.
- Set the Filter mode to Point in the Inspector window.
And that’s it. The tiles should look crisp now.
Summary
In this post we explored how to build a basic level in Unity using tiles. We’ve imported an image with multiple tiles that we can use in the editor. Next, we created a level and added a few details here and there.
In the next post, we’ll look at adding a player to the level and moving the player around the level.